
Sweet Potato Tower DIY: Unleash Your Inner Gardener! Ever dreamt of harvesting a bounty of sweet potatoes without sacrificing precious garden space? I know I have! This isn’t just another gardening project; it’s a game-changer for small spaces and a fantastic way to maximize your yield. Get ready to roll up your sleeves because we’re diving into the wonderful world of vertical gardening with a Sweet Potato Tower DIY project that’s both fun and incredibly rewarding.
While the exact origins of vertical gardening are debated, the concept has been around for centuries, from the Hanging Gardens of Babylon to the ingenious agricultural practices of ancient civilizations. Today, it’s experiencing a resurgence, fueled by a desire for sustainable food production and a growing awareness of space limitations in urban environments.
Why do you need this Sweet Potato Tower DIY trick in your life? Well, let’s face it, traditional sweet potato gardening can be space-intensive. These sprawling vines need room to roam! But with our DIY tower, you can grow a surprising amount of sweet potatoes in a fraction of the space. Plus, it’s a visually stunning addition to any garden, patio, or balcony. Imagine the satisfaction of harvesting your own homegrown sweet potatoes, knowing you created this vertical oasis yourself. So, let’s get started and transform your gardening dreams into a delicious reality!
Süßkartoffelturm selber bauen: Eine Schritt-für-Schritt-Anleitung
Hallo liebe Gartenfreunde! Habt ihr Lust auf eine etwas andere Art, Süßkartoffeln anzubauen? Dann ist ein Süßkartoffelturm genau das Richtige für euch! Es ist nicht nur platzsparend, sondern auch ein echter Hingucker in eurem Garten oder auf dem Balkon. Ich zeige euch, wie ihr diesen Turm ganz einfach selber bauen könnt. Keine Angst, es ist einfacher als es aussieht!
Was du für deinen Süßkartoffelturm brauchst:
Hier ist eine Liste der Materialien und Werkzeuge, die du für dein Projekt benötigst. Ich habe versucht, alles so genau wie möglich aufzulisten, damit du gut vorbereitet bist.
* Tontöpfe in verschiedenen Größen: Du brauchst mindestens drei Töpfe, idealerweise in Größen, die gut ineinander passen. Zum Beispiel: ein großer Topf (ca. 40 cm Durchmesser), ein mittelgroßer Topf (ca. 30 cm Durchmesser) und ein kleiner Topf (ca. 20 cm Durchmesser). Je mehr Töpfe, desto höher und ertragreicher wird dein Turm!
* Bohrmaschine mit Steinbohrer: Damit bohren wir Löcher in die Seiten der Töpfe. Die Größe des Bohrers sollte etwa 2-3 cm betragen.
* Pflanzerde: Am besten eine hochwertige Pflanzerde, die gut Wasser speichert und gleichzeitig locker ist.
* Süßkartoffel-Setzlinge: Du kannst entweder vorgezogene Setzlinge kaufen oder Süßkartoffeln selbst ziehen. Dazu später mehr!
* Gießkanne: Zum Bewässern deiner Süßkartoffeln.
* Handschuhe: Zum Schutz deiner Hände beim Umgang mit Erde.
* Schaufel oder Kelle: Zum Befüllen der Töpfe mit Erde.
* Optional: Drainagematerial (z.B. Tonscherben oder Kies) für den Boden der Töpfe.
* Optional: Mulch (z.B. Stroh oder Holzhackschnitzel) zur Abdeckung der Erde.
Süßkartoffel-Setzlinge ziehen (optional):
Wenn du deine Süßkartoffel-Setzlinge selbst ziehen möchtest, brauchst du etwas Vorlaufzeit. Aber es ist wirklich nicht schwer!
1. Süßkartoffel vorbereiten: Nimm eine gesunde Süßkartoffel und halbiere sie.
2. In Wasser stellen: Stecke Zahnstocher in die Seiten der Süßkartoffelhälften, so dass sie etwa zur Hälfte im Wasser hängen. Stelle die Süßkartoffeln in ein Glas oder eine Schale mit Wasser.
3. Warten und beobachten: Stelle das Glas an einen hellen, warmen Ort. Nach einigen Wochen sollten sich Wurzeln und Triebe bilden.
4. Setzlinge abtrennen: Sobald die Triebe etwa 15-20 cm lang sind, kannst du sie vorsichtig von der Süßkartoffel abtrennen.
5. Bewurzeln lassen: Stelle die abgetrennten Triebe in ein Glas mit Wasser, bis sie eigene Wurzeln bilden. Das dauert in der Regel ein paar Tage.
Der Bau des Süßkartoffelturms: Schritt für Schritt
Jetzt geht es ans Eingemachte! Hier zeige ich dir, wie du deinen Süßkartoffelturm zusammenbaust.
1. Löcher bohren: Nimm den größten Topf und bohre mit dem Steinbohrer Löcher in die Seitenwände. Die Löcher sollten etwa 5-10 cm vom oberen Rand entfernt sein und einen Durchmesser von 2-3 cm haben. Bohre gleichmäßig verteilt Löcher rund um den Topf. Wiederhole diesen Schritt für die anderen Töpfe. Achte darauf, dass du beim Bohren eine Schutzbrille trägst!
2. Drainage legen: Lege eine Schicht Drainagematerial (z.B. Tonscherben oder Kies) auf den Boden des größten Topfes. Das verhindert Staunässe.
3. Erde einfüllen: Fülle den größten Topf mit Pflanzerde, bis etwa 10 cm unter den oberen Rand.
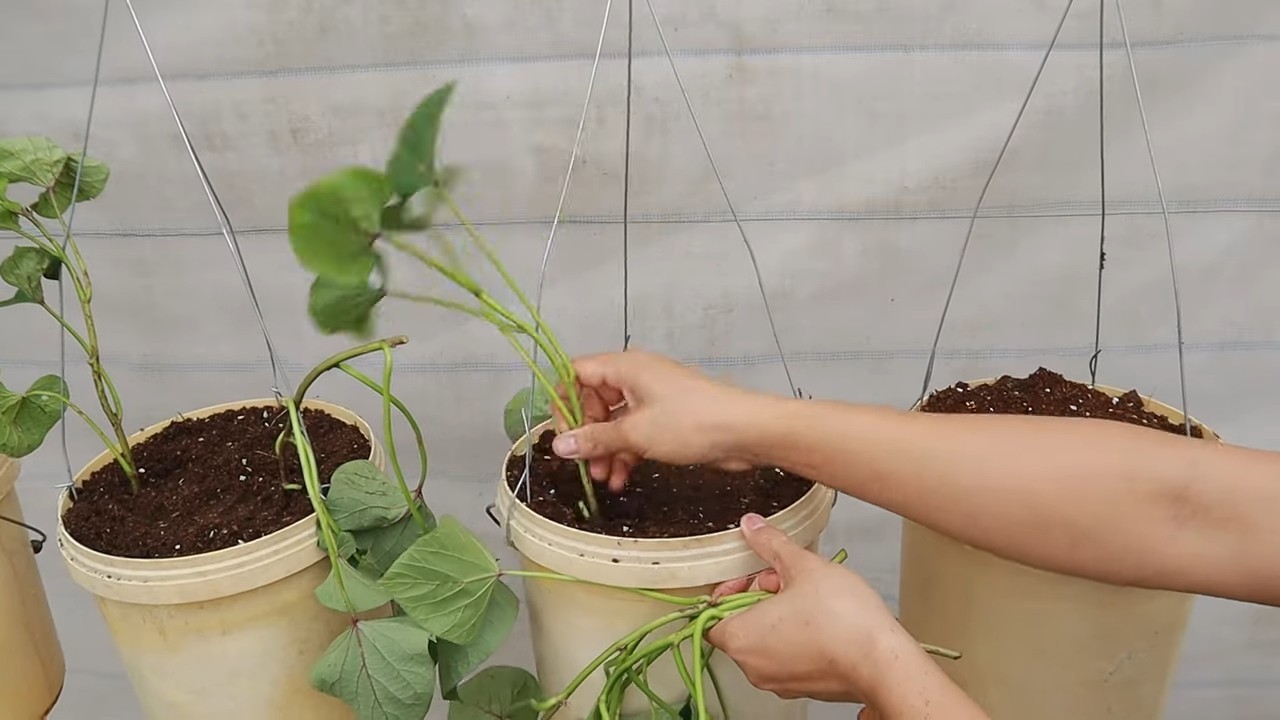
4. Mittleren Topf platzieren: Setze den mittelgroßen Topf mittig in den größten Topf. Fülle den Zwischenraum zwischen den beiden Töpfen mit Erde.
5. Erde auffüllen: Fülle den mittleren Topf mit Erde, bis etwa 10 cm unter den oberen Rand.
6. Kleinen Topf platzieren: Setze den kleinsten Topf mittig in den mittleren Topf. Fülle den Zwischenraum zwischen den beiden Töpfen mit Erde.
7. Erde auffüllen: Fülle den kleinsten Topf mit Erde, bis etwa 10 cm unter den oberen Rand.
8. Pflanzen: Jetzt kannst du deine Süßkartoffel-Setzlinge pflanzen. Setze sie in die Löcher in den Seitenwänden der Töpfe und in die Erde oben in den Töpfen. Achte darauf, dass die Wurzeln gut mit Erde bedeckt sind.
9. Gießen: Gieße deinen Süßkartoffelturm gründlich an.
Pflege deines Süßkartoffelturms:
Damit deine Süßkartoffeln gut wachsen und gedeihen, ist die richtige Pflege wichtig.
* Standort: Süßkartoffeln lieben die Sonne! Stelle deinen Turm an einen sonnigen Standort, an dem er mindestens 6 Stunden Sonne pro Tag bekommt.
* Bewässerung: Gieße regelmäßig, besonders an heißen Tagen. Die Erde sollte immer leicht feucht sein, aber nicht nass. Vermeide Staunässe.
* Düngung: Dünge deine Süßkartoffeln regelmäßig mit einem organischen Dünger.
* Mulchen: Bedecke die Erde mit Mulch (z.B. Stroh oder Holzhackschnitzel). Das hält die Feuchtigkeit im Boden und unterdrückt Unkraut.
* Schutz vor Schädlingen: Kontrolliere deine Pflanzen regelmäßig auf Schädlinge. Bei Bedarf kannst du biologische Schädlingsbekämpfungsmittel einsetzen.
Erntezeit:
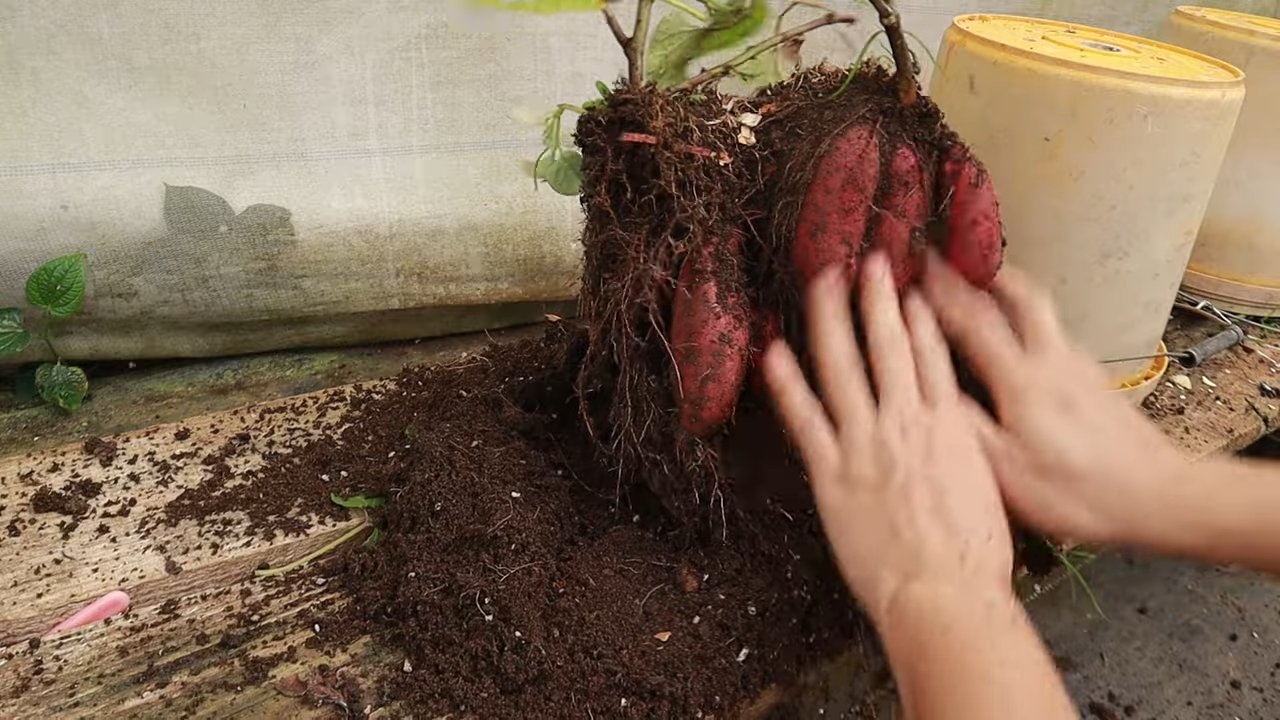
Die Erntezeit für Süßkartoffeln ist im Herbst, kurz vor dem ersten Frost.
* Anzeichen der Reife: Die Blätter der Süßkartoffelpflanzen werden gelb und beginnen abzusterben.
* Ernte: Grabe die Süßkartoffeln vorsichtig aus der Erde. Sei dabei vorsichtig, um die Knollen nicht zu beschädigen.
* Trocknen: Lasse die geernteten Süßkartoffeln ein paar Tage an einem warmen, trockenen Ort trocknen. Das verbessert die Lagerfähigkeit.
Tipps und Tricks für deinen Süßkartoffelturm:
Hier sind noch ein paar zusätzliche Tipps, die dir helfen können, deinen Süßkartoffelturm noch erfolgreicher zu machen:
* Verschiedene Sorten: Du kannst verschiedene Süßkartoffelsorten in deinem Turm anbauen. Das sorgt für Abwechslung und ist ein echter Hingucker.
* Kombination mit anderen Pflanzen: Du kannst deinen Süßkartoffelturm auch mit anderen Pflanzen kombinieren, z.B. mit Kräutern oder Blumen.
* Vertikale Bepflanzung: Nutze die Höhe deines Turms optimal aus, indem du die Süßkartoffelpflanzen nach oben wachsen lässt. Du kannst sie z.B. an einem Rankgitter befestigen.
* Regelmäßiges Drehen: Drehe deinen Süßkartoffelturm regelmäßig, damit alle Seiten gleichmäßig Sonne bekommen.
* Bodenverbesserung: Wenn du keinen guten Gartenboden hast, kannst du ihn mit Kompost oder anderen organischen Materialien verbessern.
Ich hoffe, diese Anleitung hilft dir dabei, deinen eigenen Süßkartoffelturm zu bauen. Es ist ein tolles Projekt, das nicht nur Spaß macht, sondern auch leckere und gesunde Süßkartoffeln liefert. Viel Erfolg und viel Spaß beim Gärtnern!
Conclusion
So, there you have it! Building your own sweet potato tower isn’t just a fun weekend project; it’s a game-changer for your garden and your harvest. We’ve walked you through the steps, highlighting how simple and cost-effective it is to create a thriving vertical garden specifically designed for sweet potatoes. Forget sprawling vines taking over your precious garden space. This method concentrates growth, maximizes yield, and keeps those delicious tubers clean and easy to harvest.
The beauty of this DIY sweet potato tower lies in its adaptability. Feel free to experiment with different materials. Instead of chicken wire, consider using sturdy hardware cloth for a more robust structure, especially if you live in an area prone to strong winds. Or, if you’re feeling particularly creative, repurpose old tires (thoroughly cleaned, of course!) to create a tiered tower effect. Remember to adjust the size of your tower based on the number of slips you intend to plant. A larger tower will accommodate more plants and provide ample space for root development.
Don’t be afraid to get your hands dirty and personalize your sweet potato tower. Consider adding companion plants like marigolds or nasturtiums around the base to deter pests and attract beneficial insects. You can also incorporate a simple irrigation system by burying a perforated pipe within the tower, ensuring even watering throughout.
The benefits extend beyond just space-saving and increased yields. A sweet potato tower elevates your plants, improving air circulation and reducing the risk of fungal diseases. It also makes harvesting a breeze – no more digging through tangled vines! Simply dismantle the tower layer by layer and collect your bounty of sweet potatoes.
But the real magic happens when you taste the fruits (or rather, the tubers!) of your labor. Homegrown sweet potatoes, nurtured in your own DIY tower, offer a flavor that surpasses anything you’ll find in the grocery store. The satisfaction of knowing you cultivated these delicious and nutritious vegetables from start to finish is truly rewarding.
We strongly encourage you to give this DIY sweet potato tower a try. It’s a project that’s both educational and incredibly satisfying. And once you’ve experienced the joy of harvesting your own tower-grown sweet potatoes, you’ll never look back.
We’re eager to hear about your experiences! Share your photos, tips, and variations on social media using #SweetPotatoTowerDIY. Let’s build a community of tower-growing enthusiasts and inspire others to embrace this innovative gardening technique. What worked well for you? What challenges did you encounter? Your insights will help others succeed and further refine this method. So, grab your tools, gather your materials, and get ready to elevate your sweet potato growing game! Happy gardening!
Frequently Asked Questions (FAQ)
What kind of soil should I use for my sweet potato tower?
The ideal soil for your sweet potato tower is a well-draining, loamy mix that’s rich in organic matter. Sweet potatoes thrive in soil that’s slightly acidic, with a pH between 5.5 and 6.5. You can create your own mix by combining equal parts of garden soil, compost, and sand or perlite. Avoid heavy clay soils, as they can restrict root growth and lead to misshapen tubers. Amending your soil with aged manure or other organic matter will provide essential nutrients and improve drainage. Remember, healthy soil is the foundation for a successful sweet potato harvest.
How often should I water my sweet potato tower?
Watering frequency depends on several factors, including the weather, the type of soil you’re using, and the size of your tower. Generally, you should water your sweet potato tower whenever the top inch of soil feels dry to the touch. During hot, dry periods, you may need to water daily. Avoid overwatering, as this can lead to root rot. Ensure that your tower has adequate drainage to prevent water from pooling at the bottom. A good way to check if your plants need water is to observe the leaves. If they start to wilt or droop, it’s a sign that they’re thirsty. Consider using a soaker hose or drip irrigation system to provide consistent and efficient watering.
How many sweet potato slips can I plant in one tower?
The number of sweet potato slips you can plant in one tower depends on the size of the tower and the variety of sweet potato you’re growing. As a general guideline, allow at least 12 inches of space between each slip. For a standard-sized tower (approximately 4 feet tall and 3 feet in diameter), you can typically plant 4-6 slips per layer, depending on the spacing. Avoid overcrowding, as this can restrict growth and reduce yields. If you’re growing a more vigorous variety, you may need to plant fewer slips to allow for adequate space. Remember, it’s better to err on the side of caution and provide ample room for your plants to thrive.
How do I know when my sweet potatoes are ready to harvest from the tower?
Sweet potatoes are typically ready to harvest about 90-120 days after planting, depending on the variety and growing conditions. A good indicator is when the leaves start to turn yellow and the vines begin to die back. You can also gently dig around the base of a plant to check the size of the tubers. They should be at least a few inches in diameter. Avoid harvesting after a heavy rain, as the soil will be waterlogged and the tubers will be more susceptible to damage. To harvest, carefully dismantle the tower layer by layer, gently loosening the soil around each plant and lifting the sweet potatoes out. Handle them with care to avoid bruising or cutting the skin.
What are some common pests and diseases that affect sweet potatoes, and how can I prevent them in my tower?
Common pests that can affect sweet potatoes include sweet potato weevils, flea beetles, and aphids. Diseases include fungal infections like stem rot and black rot. To prevent these problems in your tower, start with healthy, disease-free slips. Practice crop rotation and avoid planting sweet potatoes in the same location year after year. Keep the area around your tower clean and free of weeds, which can harbor pests and diseases. Use organic pest control methods, such as insecticidal soap or neem oil, to control infestations. Ensure good air circulation within the tower to prevent fungal diseases. Regularly inspect your plants for signs of pests or diseases and take action promptly if you notice any problems. Companion planting with herbs like basil or rosemary can also help deter pests.
Can I reuse the soil from my sweet potato tower for other plants?
Yes, you can reuse the soil from your sweet potato tower, but it’s important to amend it before planting other crops. Sweet potatoes are heavy feeders, so the soil may be depleted of nutrients after a growing season. Add compost, aged manure, or other organic matter to replenish the nutrients. You may also want to test the soil pH and adjust it as needed. Avoid planting other root crops in the same soil immediately after sweet potatoes, as they may be susceptible to the same pests and diseases. Consider planting a cover crop, such as clover or buckwheat, to improve soil health and suppress weeds.
What are some variations I can try with my sweet potato tower design?
There are many ways to customize your sweet potato tower design to suit your needs and preferences. You can use different materials for the tower structure, such as wood, plastic barrels, or even old tires. Consider adding a built-in irrigation system by burying a perforated pipe within the tower. You can also incorporate a composting system by adding a layer of compost at the bottom of the tower. Experiment with different planting arrangements, such as interplanting with companion plants or creating a tiered effect with different varieties of sweet potatoes. Get creative and have fun with it! The possibilities are endless.
How do I cure my sweet potatoes after harvesting them from the tower?
Curing sweet potatoes is essential for improving their flavor and storage life. After harvesting, gently brush off any excess soil and allow the sweet potatoes to dry in a well-ventilated area for a few hours. Then, cure them in a warm, humid environment (80-85°F and 85-90% humidity) for 5-7 days. You can achieve this by placing them in a cardboard box or container with a lid and storing them in a warm room or greenhouse. After curing, store the sweet potatoes in a cool, dry, and dark place (55-60°F) for several months. Avoid storing them in the refrigerator, as this can cause them to develop a hard core. Properly cured and stored sweet potatoes will be sweeter and more flavorful.

Leave a Comment