
Bottle Gardening Garlic: Ever dreamed of having fresh, flavorful garlic right at your fingertips, even if you don’t have a sprawling garden? I know I have! Forget those expensive grocery store bulbs – we’re diving into the wonderful world of upcycling and growing our own delicious garlic using something you probably already have lying around: plastic bottles!
For centuries, garlic has been a staple in cuisines around the globe, not just for its pungent flavor but also for its purported health benefits. From ancient Egyptian tombs to modern-day kitchens, garlic’s presence is undeniable. But what if I told you that you could cultivate this culinary treasure in a surprisingly simple and sustainable way?
In today’s fast-paced world, finding time and space for traditional gardening can be a challenge. That’s where this DIY bottle gardening garlic trick comes in! It’s perfect for apartment dwellers, busy bees, or anyone looking for a fun and eco-friendly way to grow their own food. Imagine the satisfaction of snipping fresh garlic greens to add to your salads or using your homegrown cloves to create the perfect garlic-infused oil. This guide will walk you through each step, ensuring you have a thriving garlic patch, all within the confines of a recycled bottle. Let’s get started!
Bottle Gardening: Grow Garlic Indoors with Ease!
Hey there, fellow gardening enthusiasts! Ever thought about growing garlic indoors? It’s easier than you think, and all you need is a plastic bottle and a little bit of patience. I’m going to walk you through the whole process, step-by-step, so you can enjoy fresh garlic greens right from your windowsill. Let’s get started!
What You’ll Need
Before we dive in, let’s gather our supplies. This is a super budget-friendly project, so you probably have most of these items lying around already.
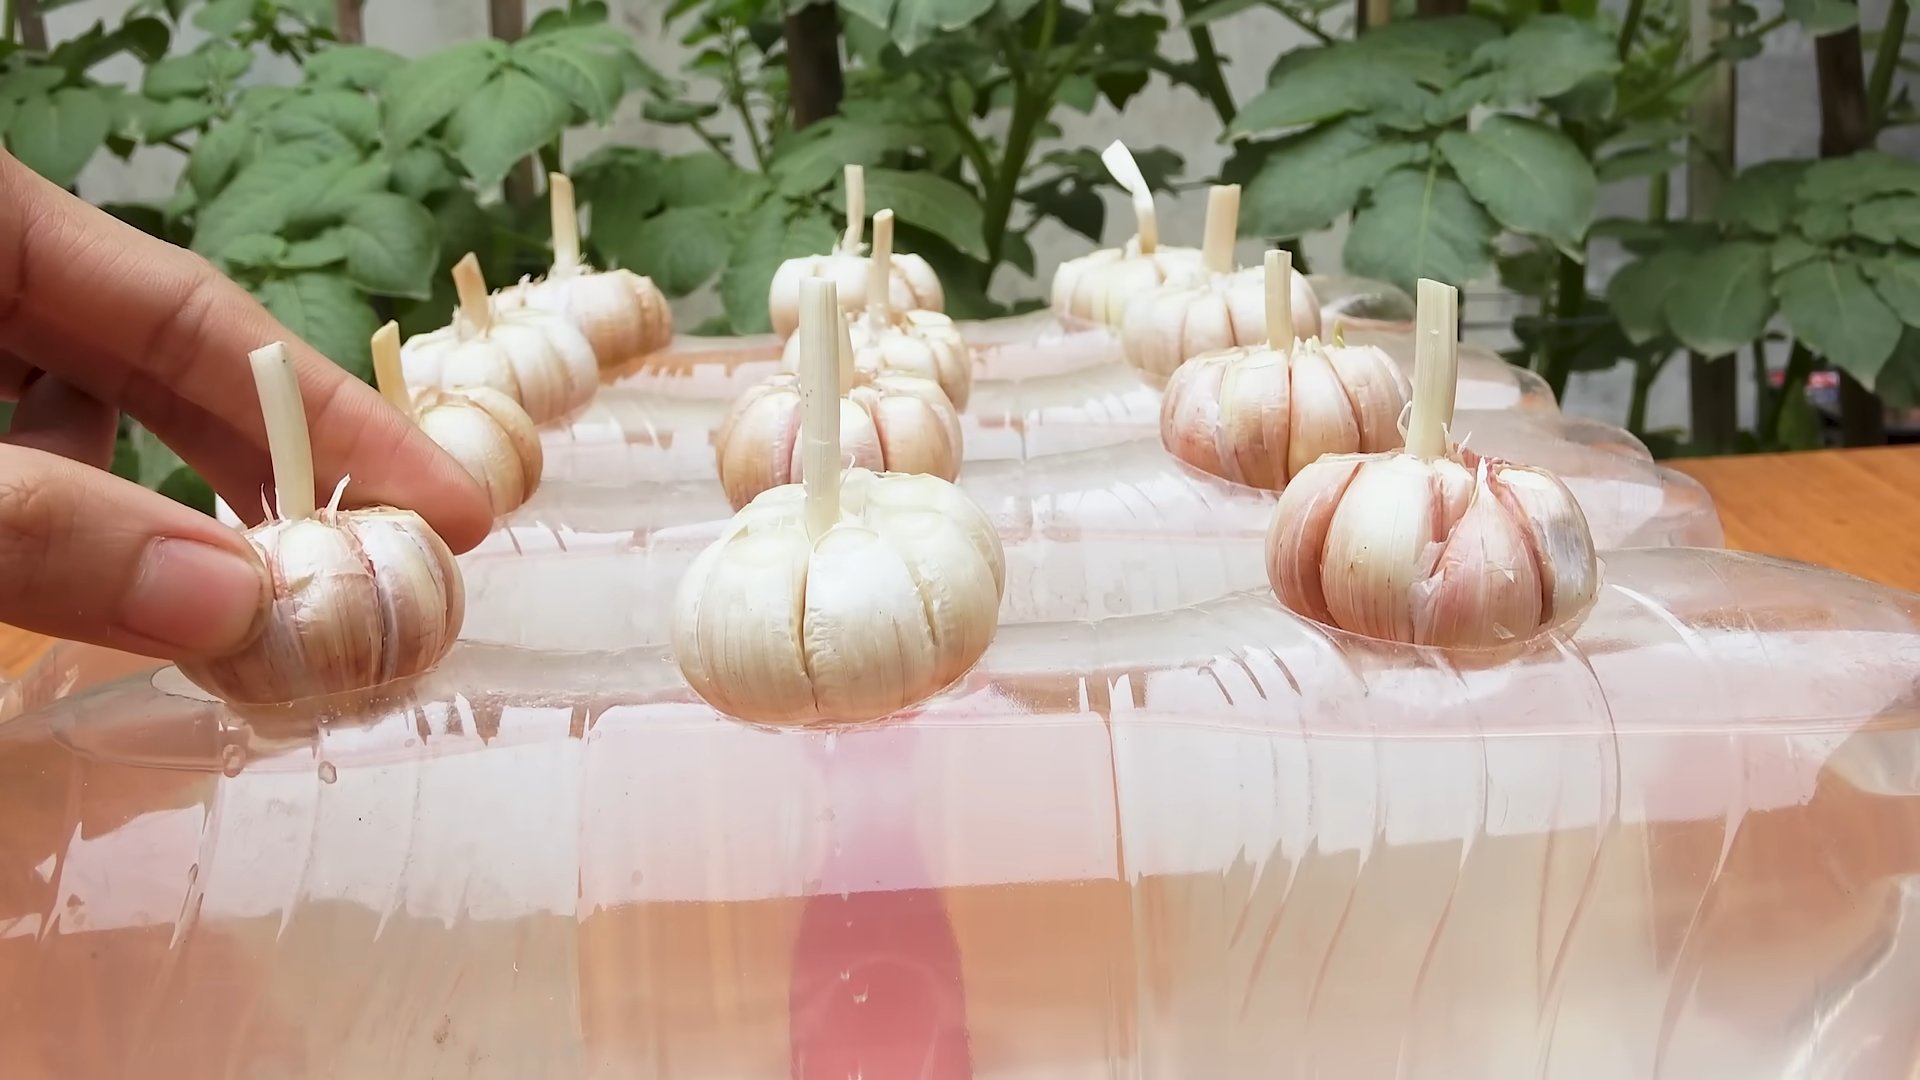
* A large plastic bottle: Think soda bottles, water jugs, or even juice containers. The bigger, the better, as it will give your garlic roots plenty of room to grow. I usually use a 2-liter soda bottle.
* Garlic cloves: Choose organic garlic if possible, as it’s less likely to be treated with chemicals that could inhibit growth. Look for firm, healthy cloves with no signs of mold or rot.
* Potting soil: A good quality potting mix is essential for providing your garlic with the nutrients it needs.
* Gravel or small stones: This will help with drainage and prevent the soil from becoming waterlogged.
* A sharp knife or scissors: For cutting the bottle. Be careful!
* Water: For watering your garlic.
* Spray bottle (optional): For misting the garlic greens.
* Gloves (optional): To keep your hands clean.
Preparing the Bottle
Okay, let’s get our bottle ready for planting. This is a crucial step, so pay close attention.
1. Clean the bottle: Wash the bottle thoroughly with soap and water to remove any residue. Rinse it well and let it dry completely. This will help prevent mold and bacteria from growing.
2. Cut the bottle: Decide where you want to cut the bottle. I usually cut it about one-third of the way down from the top. This creates a reservoir for water at the bottom. Use your sharp knife or scissors to carefully cut along the line. Be extra careful not to cut yourself!
3. Drill drainage holes (optional but recommended): If you’re worried about overwatering, you can drill a few small drainage holes in the bottom of the bottle. This will allow excess water to escape. If you skip this step, be extra mindful of how much you water.
4. Reassemble the bottle: Invert the top portion of the bottle (the part you cut off) and place it inside the bottom portion, creating a self-watering system.
Planting the Garlic
Now for the fun part – planting the garlic! This is where we bring our little garlic cloves to life.
1. Add gravel to the bottom: Pour a layer of gravel or small stones into the bottom of the bottle (the reservoir). This will help with drainage and prevent the soil from sitting in water. About an inch or two should be sufficient.
2. Fill with potting soil: Fill the top portion of the bottle (the part with the neck) with potting soil, leaving about an inch of space at the top. Gently pat down the soil to remove any air pockets.
3. Prepare the garlic cloves: Gently separate the cloves from the garlic bulb, being careful not to damage them. You don’t need to peel the cloves.
4. Plant the cloves: Make small holes in the soil, about an inch deep and a few inches apart. Place each garlic clove in a hole, pointy side up. This is important because the green shoots will emerge from the pointy end.
5. Cover with soil: Gently cover the garlic cloves with soil, making sure they are completely buried.
6. Water thoroughly: Water the soil thoroughly until it is evenly moist. The water should drain into the reservoir at the bottom of the bottle.
Caring for Your Garlic
Alright, your garlic is planted! Now, let’s talk about how to care for it so it thrives.
1. Location: Place your bottle garden in a sunny location, such as a windowsill that receives at least 6 hours of sunlight per day. Garlic needs plenty of light to grow. If you don’t have enough natural light, you can supplement with a grow light.
2. Watering: Check the soil moisture regularly. Water when the top inch of soil feels dry to the touch. Pour water into the reservoir at the bottom of the bottle. The soil will absorb the water as needed. Avoid overwatering, as this can lead to root rot.
3. Fertilizing (optional): If you want to give your garlic an extra boost, you can fertilize it every few weeks with a diluted liquid fertilizer. Follow the instructions on the fertilizer package. I personally don’t fertilize mine, and they still grow well.
4. Misting (optional): Misting the garlic greens with water can help keep them hydrated and prevent them from drying out. This is especially helpful in dry climates.
5. Harvesting: You can start harvesting the garlic greens when they are about 6-8 inches tall. Simply snip off the greens with scissors, leaving about an inch or two of growth. The garlic will continue to produce new greens. You can harvest the greens multiple times.
6. Bulb Development: While you’re primarily growing for the greens in this method, you *might* get a small bulb forming. However, don’t expect a full-sized garlic bulb like you’d get from planting in the ground. The focus here is on the delicious, garlicky greens.
Troubleshooting
Even with the best care, sometimes things can go wrong. Here are a few common problems and how to fix them.
* Yellowing leaves: This could be a sign of overwatering, underwatering, or nutrient deficiency. Check the soil moisture and adjust your watering accordingly. If you suspect a nutrient deficiency, try fertilizing with a diluted liquid fertilizer.
* Mold growth: This is usually caused by poor ventilation or overwatering. Make sure your bottle garden is in a well-ventilated area. You can also try spraying the soil with a diluted solution of hydrogen peroxide and water.
* Slow growth: This could be due to lack of sunlight or poor soil quality. Make sure your bottle garden is in a sunny location and that you are using a good quality potting mix.
Enjoying Your Garlic Greens
Now for the best part – enjoying the fruits (or rather, greens!) of your labor. Garlic greens have a mild, garlicky flavor that is perfect for adding to salads, soups, stir-fries, and other dishes.
* Salads: Chop the garlic greens and add them to your favorite salad for a burst of flavor.
* Soups: Add chopped garlic greens to soups and stews for a delicious garlicky kick.
* Stir-fries: Add chopped garlic greens to stir-fries for a flavorful and aromatic addition.
* Pesto: Use garlic greens to make a unique and flavorful pesto.
* Garnish: Use garlic greens as a garnish for your favorite dishes.
Why Bottle Gardening is Awesome
I absolutely love bottle gardening, and here’s why:
* It’s eco-friendly: You’re repurposing plastic bottles that would otherwise end up in a landfill.
* It’s space-saving: Perfect for small apartments or homes with limited outdoor space.
* It’s budget-friendly: You don’t need expensive gardening equipment.
* It’s easy: Even beginners can successfully grow garlic in a bottle.
* It’s rewarding: There’s nothing quite like harvesting fresh garlic greens from your own indoor garden.
Tips for Success
Here are a few extra tips to help you succeed with your bottle garden:
* Use filtered water: Tap water can contain chlorine and other chemicals that can harm your plants.
* Rotate the bottle: Rotate the bottle regularly to ensure that all sides receive equal sunlight.
* Monitor for pests: Keep an eye out for pests, such as aphids or spider mites. If you find any, treat them with an organic insecticide.
* Experiment: Don’t be afraid to experiment with different types of garlic and different growing conditions.
Growing Garlic Scapes
If you’re lucky, your garlic might even produce scapes! These are the curly flower stalks that grow from hardneck garlic varieties. They’re delicious and have a milder garlic flavor than the cloves.
1. Identify the scapes: Look for curly, green stalks emerging from the center of the plant.
2. Harvest the scapes: Cut the scapes off when they are still tender and curly.
3. Enjoy the scapes: Garlic scapes can be used in a variety of dishes, such as pesto, stir-fries, and soups. They can also be grilled or roasted.
Expanding Your Bottle Garden
Once you’ve

Conclusion
So, there you have it! Transforming a simple plastic bottle into a thriving garlic garden is not just a fun project; it’s a sustainable, space-saving, and incredibly rewarding way to enjoy fresh, homegrown garlic. We’ve walked you through the process, from preparing your bottle to planting your cloves and nurturing them to maturity. But why is this DIY trick a must-try?
First and foremost, it’s about accessibility. Whether you live in a sprawling suburban home or a compact city apartment, bottle gardening garlic allows you to cultivate your own produce regardless of your available outdoor space. It’s a fantastic solution for urban gardeners, balcony enthusiasts, and anyone looking to add a touch of green to their lives.
Secondly, it’s about sustainability. Repurposing plastic bottles reduces waste and gives these discarded items a new lease on life. You’re not only growing your own food but also contributing to a more environmentally conscious lifestyle. It’s a small change that can make a big difference.
Thirdly, it’s about the sheer joy of watching something grow. There’s a unique satisfaction in nurturing a plant from a tiny clove to a fully formed bulb. It’s a connection to nature that can be incredibly grounding and therapeutic. Plus, the taste of homegrown garlic is simply unmatched – more intense, more flavorful, and undeniably fresher than anything you can buy in the store.
But don’t stop there! This method is incredibly versatile. Consider experimenting with different varieties of garlic to discover your favorites. You could also try companion planting, adding herbs like rosemary or thyme to your bottle garden to deter pests and enhance the flavor of your garlic. Another variation is to use different sizes of bottles to accommodate more garlic cloves or to create a tiered garden for visual appeal. You can even paint or decorate your bottles to personalize your garden and make it a true reflection of your style.
Ready to get started? We wholeheartedly encourage you to give this DIY bottle gardening garlic trick a try. It’s a simple, affordable, and incredibly rewarding project that will bring fresh flavor and a touch of green to your life. Don’t be afraid to experiment, adapt the method to your specific needs and preferences, and most importantly, have fun!
And once you’ve harvested your first crop of homegrown garlic, we’d love to hear about your experience. Share your photos, tips, and stories in the comments below. Let’s build a community of bottle gardening enthusiasts and inspire others to embrace this sustainable and rewarding practice. Happy gardening!
Frequently Asked Questions (FAQ)
What kind of plastic bottle is best for bottle gardening garlic?
The ideal plastic bottle for growing garlic is a sturdy, food-grade bottle with a wide mouth. Two-liter soda bottles or larger water bottles work well. Ensure the bottle is clean and free of any residue before you begin. Avoid using bottles that have contained harsh chemicals, as these could contaminate your soil and garlic. The bottle should also be opaque or semi-opaque to protect the roots from direct sunlight, which can hinder growth. If you only have clear bottles, consider painting the outside or wrapping them in dark-colored material.
How many garlic cloves can I plant in one bottle?
The number of garlic cloves you can plant in a single bottle depends on the size of the bottle. As a general rule, allow at least 4-6 inches of space between each clove to ensure adequate room for growth. For a standard two-liter bottle, you can typically plant 3-4 cloves. Overcrowding can lead to smaller bulbs and increased risk of disease. If you’re using a larger bottle, you can plant more cloves, but always maintain sufficient spacing.
What type of soil should I use for bottle gardening garlic?
Garlic thrives in well-draining, nutrient-rich soil. A good potting mix specifically formulated for vegetables is ideal. You can also create your own mix by combining equal parts of garden soil, compost, and perlite or vermiculite. The compost provides essential nutrients, while the perlite or vermiculite improves drainage and aeration. Avoid using heavy clay soil, as it can become waterlogged and lead to root rot.
How often should I water my bottle garden garlic?
Water your bottle garden garlic regularly, especially during dry periods. The soil should be consistently moist but not waterlogged. Check the soil moisture by inserting your finger about an inch deep. If the soil feels dry, it’s time to water. Water deeply, allowing the excess water to drain out of the drainage holes. Reduce watering during the dormant season (winter) when the garlic’s growth slows down.
How much sunlight does bottle garden garlic need?
Garlic requires at least 6-8 hours of direct sunlight per day to thrive. Place your bottle garden in a sunny location, such as a south-facing window or balcony. If you don’t have access to enough natural sunlight, you can supplement with grow lights. Rotate the bottle garden regularly to ensure that all sides receive equal sunlight.
How long does it take to grow garlic in a bottle?
Growing garlic in a bottle takes approximately 6-9 months, depending on the variety and growing conditions. You’ll typically plant the cloves in the fall and harvest the bulbs in the late spring or early summer. Be patient and monitor your plants regularly.
How do I know when my garlic is ready to harvest?
The best time to harvest your garlic is when the lower leaves start to turn yellow and brown, but the top leaves are still green. This usually happens in late spring or early summer. Gently loosen the soil around the base of the plant and carefully pull the bulb out of the bottle.
Can I grow different varieties of garlic in a bottle garden?
Yes, you can grow different varieties of garlic in a bottle garden. Experiment with different types to find your favorites. Softneck varieties are generally easier to grow in containers than hardneck varieties. Consider the climate in your area when choosing your garlic varieties.
How do I prevent pests and diseases in my bottle garden garlic?
To prevent pests and diseases, use a high-quality potting mix and ensure good drainage. Avoid overwatering, as this can lead to root rot. Regularly inspect your plants for signs of pests or diseases. If you notice any problems, treat them promptly with organic pest control methods or fungicides. Companion planting with herbs like rosemary or thyme can also help deter pests.
Can I reuse the soil from my bottle garden garlic?
It’s generally not recommended to reuse the soil from your bottle garden garlic without amending it. Garlic is a heavy feeder and depletes the soil of nutrients. If you want to reuse the soil, amend it with plenty of compost and other organic matter to replenish the nutrients. You can also sterilize the soil by baking it in the oven to kill any potential pathogens. However, starting with fresh potting mix is always the best option.

Leave a Comment