
Terrace Potato Growing No Soil – sounds like magic, right? Well, it’s not quite magic, but it’s pretty darn close! Imagine harvesting a bounty of delicious, homegrown potatoes right from your terrace, without ever getting your hands dirty in soil. I know, it seems too good to be true, but trust me, it’s totally achievable with this simple and rewarding DIY project.
Potatoes have been a staple food for centuries, with their cultivation dating back thousands of years in the Andes Mountains. From humble beginnings, they’ve become a global phenomenon, nourishing populations worldwide. But who says you need a sprawling farm to enjoy the fruits (or rather, tubers!) of your labor?
In today’s world, where space is a premium and sustainable living is more important than ever, finding innovative ways to grow our own food is crucial. This terrace potato growing no soil method is perfect for urban dwellers, apartment residents, or anyone with limited garden space. It’s also a fantastic option for those who want to avoid the back-breaking work of traditional gardening. Plus, it’s a fun and educational project for the whole family! So, ditch the dirt, embrace the ingenuity, and let’s get growing!
Terrace Potato Growing: Ditch the Dirt, Embrace the Stack!
Hey there, fellow gardening enthusiasts! Are you dreaming of fresh, homegrown potatoes but lack the space (or the desire to dig in the dirt)? Well, I’ve got a fantastic solution for you: terrace potato growing, completely soil-free! This method is perfect for balconies, patios, or any small space where you want to maximize your yield without the mess. Trust me, it’s easier than you think, and the results are incredibly rewarding.
What You’ll Need
Before we dive in, let’s gather our supplies. This is a relatively low-cost project, and you might already have some of these items lying around:
* Seed Potatoes: Choose your favorite variety! I personally love Yukon Gold for their creamy texture and delicious flavor. Make sure they are certified seed potatoes to avoid diseases.
* Large Containers: Think big! We’re talking about containers that are at least 18 inches in diameter and 18 inches deep. Plastic storage bins, large buckets, or even repurposed trash cans (cleaned thoroughly, of course!) will work. You’ll need several of these, depending on how many potato plants you want.
* Straw or Hay: This is our soil substitute! It provides a fluffy, airy medium for the potato roots to grow in. Make sure it’s clean and free of weed seeds.
* Compost: This is our food source for the potatoes. We’ll be layering it in with the straw to provide essential nutrients.
* Water: Potatoes need consistent moisture, so have a watering can or hose handy.
* Fertilizer (Optional): A balanced, slow-release fertilizer can give your potatoes an extra boost. Look for one specifically formulated for vegetables.
* Knife: For cutting the seed potatoes (if necessary).
* Gloves: To keep your hands clean and protected.
Preparing Your Seed Potatoes
This step is crucial for getting a good start.
1. Chitting (Sprouting): About 2-3 weeks before you plan to plant, place your seed potatoes in a cool, bright location (but not direct sunlight). This encourages them to sprout “eyes,” which will become the stems of your potato plants. You can use an egg carton or a shallow tray to hold them.
2. Cutting (Optional): If your seed potatoes are large (bigger than an egg), you can cut them into smaller pieces. Each piece should have at least 2-3 “eyes.” Let the cut pieces dry for a day or two to callous over. This helps prevent rotting. I usually don’t cut mine unless they are really big.
Building Your Potato Terrace
Now for the fun part! We’re going to create a layered “terrace” within our containers.
1. Prepare the Container: Make sure your container has drainage holes. If it doesn’t, drill a few in the bottom.
2. First Layer: Add a layer of straw or hay to the bottom of the container, about 4-6 inches deep. This will be the base of our terrace.
3. Compost Layer: Sprinkle a layer of compost over the straw, about 1-2 inches thick. This will provide nutrients for the developing roots.
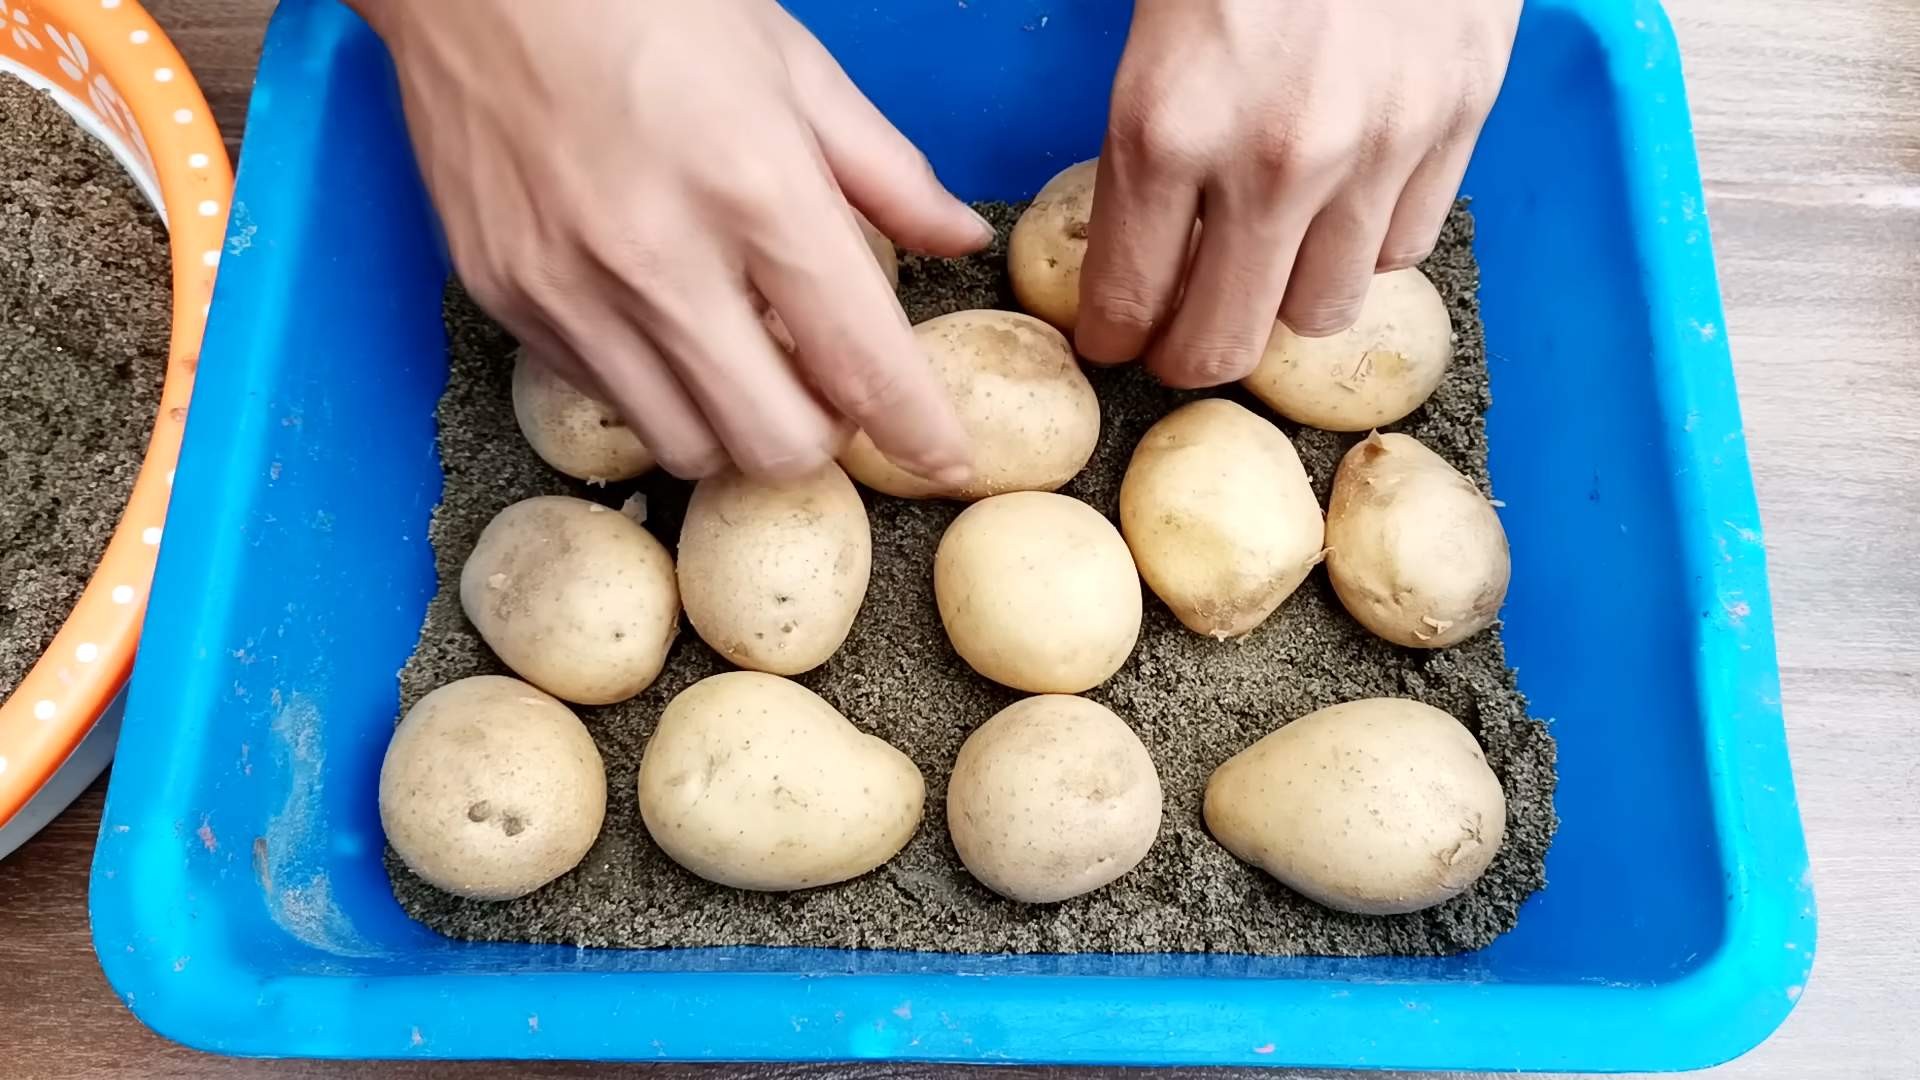
4. Planting the Seed Potatoes: Place your sprouted seed potatoes on top of the compost layer, with the “eyes” facing upwards. Space them about 12 inches apart. If you’re using cut seed potatoes, make sure the cut side is facing down.
5. Cover with Straw: Cover the seed potatoes with another layer of straw, about 4-6 inches deep.
6. Water Thoroughly: Water the container well, making sure the straw is evenly moistened.
The Hilling Process: Keep ‘Em Covered!
This is where the “terrace” concept really comes into play. As your potato plants grow, we’ll be adding more straw and compost to encourage more potato production.
1. First Hilling: When the potato plants reach about 6-8 inches tall, add another layer of straw and compost, burying the stems up to the top leaves. This encourages the plant to produce more roots along the buried stem, which means more potatoes!
2. Repeat Hilling: Continue this process every 2-3 weeks, as the plants grow taller. Keep adding layers of straw and compost until you reach the top of the container. The goal is to keep the stems covered, encouraging maximum potato production. I usually do this about 3-4 times throughout the growing season.
3. Watering: Keep the straw consistently moist, but not soggy. Potatoes need plenty of water, especially during hot weather. Check the moisture level regularly by sticking your finger into the straw.
4. Fertilizing (Optional): If you’re using fertilizer, follow the instructions on the package. I usually apply a slow-release fertilizer at planting time and then again after the first hilling.
Sunlight and Location
Potatoes need at least 6-8 hours of sunlight per day. Choose a location that gets plenty of sunshine. Also, consider the weight of the containers, especially when they’re full of straw and water. Make sure your terrace or balcony can support the weight.
Pest and Disease Control
Keep an eye out for common potato pests like aphids, potato beetles, and blight.
* Aphids: These tiny insects can suck the sap from your plants. You can control them with insecticidal soap or by simply spraying them off with a strong stream of water.
* Potato Beetles: These beetles can defoliate your potato plants. Hand-picking them off the plants is an effective method, especially for small infestations.
* Blight: This fungal disease can cause brown spots on the leaves and eventually kill the plants. To prevent blight, choose disease-resistant potato varieties and ensure good air circulation around the plants. If you see signs of blight, remove the affected leaves immediately.
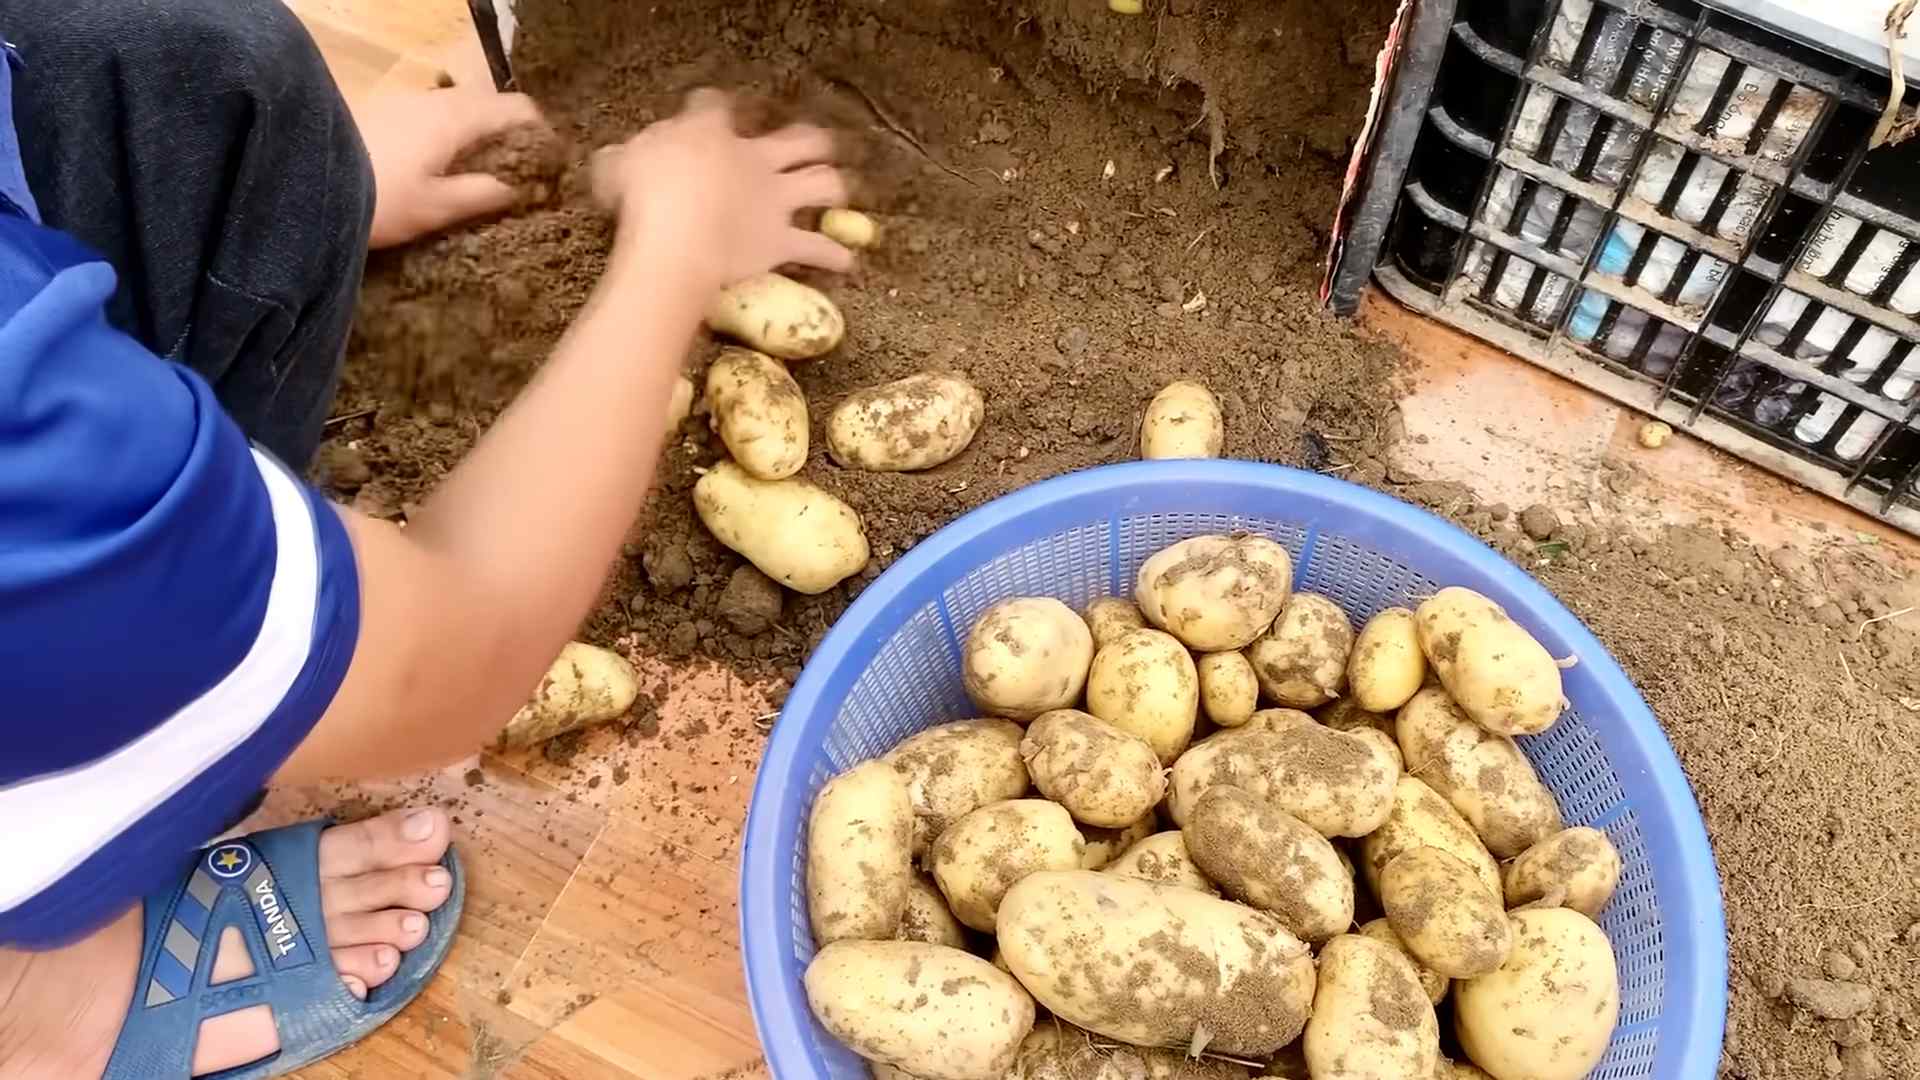
Harvesting Your Potatoes
The moment we’ve all been waiting for!
1. Timing: Potatoes are typically ready to harvest about 80-100 days after planting. You’ll know they’re ready when the plants start to flower and the foliage begins to die back.
2. Harvesting: The beauty of this method is that harvesting is super easy! Simply tip over the container and sift through the straw to find your potatoes. You can also reach in and carefully pull out the potatoes without completely emptying the container.
3. Curing: After harvesting, let the potatoes dry in a cool, dark place for a few days. This helps them develop a thicker skin and improves their storage life.
Tips and Tricks for Success
* Choose the Right Variety: Some potato varieties are better suited for container growing than others. Look for varieties that are compact and early-maturing.
* Don’t Overwater: While potatoes need plenty of water, overwatering can lead to rot. Make sure the containers have good drainage and allow the straw to dry out slightly between waterings.
* Rotate Your Crops: If you’re growing potatoes in the same containers year after year, rotate your crops to prevent soilborne diseases.
* Add Worm Castings: Worm castings are a great source of nutrients for potatoes. Add a handful to each container at planting time.
* Experiment! Don’t be afraid to try different varieties of potatoes and different growing techniques. The best way to learn is by doing.
Troubleshooting
* Plants are Yellowing: This could be a sign of nutrient deficiency. Try adding a balanced fertilizer.
* Potatoes are Small: This could be due to lack of water or nutrients. Make sure you’re watering regularly and fertilizing as needed.
* Potatoes are Green: Green potatoes contain solanine, a toxic substance. This happens when potatoes are exposed to sunlight. Make sure to keep your potatoes covered with straw.
Why I Love This Method
I’ve been growing potatoes this way for years, and I absolutely love it! It’s so much easier than traditional gardening, and it’s perfect for small spaces. Plus, the potatoes taste amazing! There’s nothing quite like the flavor of homegrown potatoes. Give it a try, and I’m sure you’ll be hooked too! Happy growing!
Conclusion
So, there you have it! Growing potatoes in a terrace garden without soil might sound unconventional, but as you’ve seen, it’s a surprisingly simple and rewarding process. This method offers a fantastic way to maximize your yield, especially if you’re working with limited space or poor soil conditions. Forget back-breaking digging and endless weeding – this technique is all about ease and efficiency.
Why is this DIY trick a must-try? Because it’s a game-changer for urban gardeners and anyone looking for a sustainable and space-saving way to grow their own food. Imagine harvesting a bountiful crop of fresh, homegrown potatoes right from your terrace, knowing you’ve bypassed the need for traditional soil-based gardening. The satisfaction is immense! Plus, it’s a fantastic conversation starter and a great way to get kids involved in the gardening process.
But the beauty of this method lies in its adaptability. Feel free to experiment with different potato varieties to find your favorites. Russets, Yukon Golds, red potatoes – they all thrive in this environment. You can also adjust the size of your container based on the space you have available. A large bin works well for a substantial harvest, while smaller buckets are perfect for a more manageable yield.
Consider adding companion plants to your potato tower. Marigolds can help deter pests, while herbs like basil and thyme can add flavor and fragrance to your terrace garden. Don’t be afraid to get creative and personalize your setup to suit your specific needs and preferences.
And speaking of personalization, think about the materials you use for your terrace potato growing setup. While we’ve focused on using readily available materials like straw or hay, you could also experiment with other organic materials like shredded leaves or compost. Just be sure to choose materials that are well-draining and provide adequate aeration for the potato roots.
Ultimately, the key to success with this method is consistent watering and monitoring. Keep the growing medium moist but not waterlogged, and watch out for any signs of pests or diseases. With a little bit of care and attention, you’ll be well on your way to enjoying a delicious harvest of homegrown potatoes.
We wholeheartedly encourage you to give this DIY terrace potato growing method a try. It’s a fun, rewarding, and sustainable way to grow your own food, and we’re confident that you’ll be amazed by the results. Don’t forget to document your progress and share your experiences with us! We’d love to see your photos, hear your tips, and learn from your successes (and even your challenges). Let’s build a community of terrace potato growers and inspire others to embrace this innovative gardening technique. Share your journey on social media using relevant hashtags and tag us so we can celebrate your green thumb achievements! Happy growing!
Frequently Asked Questions (FAQ)
What kind of potatoes are best for terrace growing without soil?
Generally, most potato varieties will grow well using this method. However, early-maturing varieties like Yukon Gold, Red Norland, and Irish Cobbler tend to be particularly successful. These varieties mature relatively quickly, making them ideal for container gardening. Experimenting with different varieties is part of the fun, so don’t be afraid to try your favorites! Just be sure to select seed potatoes that are certified disease-free.
How often should I water my terrace potato tower?
Watering frequency depends on several factors, including the climate, the type of growing medium you’re using, and the size of your container. As a general rule, you should aim to keep the growing medium consistently moist, but not waterlogged. Check the moisture level regularly by sticking your finger into the medium. If it feels dry an inch or two below the surface, it’s time to water. During hot, dry weather, you may need to water daily, while during cooler, wetter periods, you may only need to water every few days. Ensure proper drainage to prevent root rot.
What type of container is best for growing potatoes on a terrace?
The ideal container should be large enough to accommodate the growing potato plants and provide adequate drainage. A container that is at least 2 feet in diameter and 2 feet deep is generally recommended. You can use a variety of materials, such as plastic bins, wooden crates, or even repurposed containers like old tires. Just make sure the container is sturdy and has drainage holes to prevent water from accumulating at the bottom. Fabric grow bags are also a great option as they provide excellent aeration and drainage.
How do I know when my potatoes are ready to harvest?
The timing of your harvest will depend on the potato variety you’re growing. Generally, potatoes are ready to harvest when the foliage begins to turn yellow and die back. You can also gently dig around the base of the plant to check the size of the potatoes. If they are the size you desire, you can begin harvesting. To harvest, carefully remove the growing medium from the container and gently separate the potatoes from the roots.
What kind of fertilizer should I use for terrace potato growing?
Potatoes are heavy feeders, so it’s important to provide them with adequate nutrients throughout the growing season. A balanced fertilizer with an NPK ratio of 10-10-10 or 14-14-14 is generally recommended. You can also use organic fertilizers such as compost tea, fish emulsion, or bone meal. Apply fertilizer according to the package directions, and be careful not to over-fertilize, as this can damage the plants. Side-dressing with compost or well-rotted manure can also provide a slow-release source of nutrients.
How do I prevent pests and diseases from affecting my terrace potatoes?
Regularly inspect your potato plants for signs of pests or diseases. Common potato pests include aphids, potato beetles, and flea beetles. You can control these pests with insecticidal soap, neem oil, or by hand-picking them off the plants. Common potato diseases include early blight, late blight, and potato scab. To prevent these diseases, choose disease-resistant potato varieties, provide good air circulation, and avoid overwatering. Crop rotation and using certified disease-free seed potatoes are also important preventative measures.
Can I reuse the growing medium from my terrace potato tower?
Yes, you can reuse the growing medium, but it’s important to amend it with fresh compost or other organic matter to replenish the nutrients that have been depleted. You should also sterilize the growing medium to kill any potential pests or diseases. You can do this by baking the medium in the oven at 180 degrees Fahrenheit for 30 minutes or by solarizing it in a black plastic bag for several weeks.
What if I don’t have straw or hay? What else can I use?
If you don’t have access to straw or hay, you can use other organic materials such as shredded leaves, compost, peat moss, or even shredded paper. The key is to choose materials that are well-draining and provide adequate aeration for the potato roots. Avoid using materials that are too dense or compacted, as this can lead to root rot.
How much sunlight do terrace potatoes need?
Potatoes need at least 6-8 hours of direct sunlight per day to thrive. Choose a location on your terrace that receives plenty of sunlight throughout the day. If you don’t have a sunny spot, you can supplement with artificial lighting.
Is terrace potato growing organic?
Yes, terrace potato growing can absolutely be organic! By using organic growing mediums, fertilizers, and pest control methods, you can ensure that your potatoes are grown without the use of synthetic chemicals. This is a great way to enjoy fresh, healthy potatoes while minimizing your impact on the environment.
Leave a Comment