
Tomato can trick harvest: Ever feel like your precious tomatoes are disappearing faster than you can say “garden salad”? Or maybe you’re battling sneaky critters who seem to have a VIP pass to your ripening bounty? I know the feeling! As a passionate home gardener, I’ve faced my fair share of tomato-thieving challenges, and let me tell you, it can be incredibly frustrating to see your hard work vanish before your eyes.
Throughout history, the tomato has been a symbol of abundance and prosperity, gracing tables from humble kitchens to royal feasts. But enjoying the fruits (or rather, vegetables!) of your labor shouldn’t be a constant battle against pests and unpredictable weather. That’s why I’m so excited to share this simple, yet incredibly effective, DIY trick that will help you protect your ripening tomatoes and ensure a bountiful tomato can trick harvest.
This isn’t just another gardening tip; it’s a game-changer! We’ll be repurposing something you likely already have in your recycling bin – a humble tomato can – to create a mini-fortress around your precious tomatoes. This easy hack will deter pests, provide extra support, and even help reflect sunlight for even ripening. Ready to say goodbye to stolen tomatoes and hello to a truly rewarding harvest? Let’s get started!
The Tomato Crate Trick for a Bountiful Harvest: Here’s How!
Hello dear garden friends! I am so excited to show you a brilliant trick today on how you can maximize your tomato harvest using simple tomato crates. Don’t worry, it’s super easy and a lot of fun! I’ve tried it myself and was overwhelmed by the results. Let’s get started!
What you need:
- Tomato crates (preferably wooden, but plastic also works)
- Good tomato soil
- Tomato plants (of course!)
- Garden fleece (optional, but recommended)
- Compost or organic fertilizer
- Watering can or garden hose
- Gloves (to protect your hands)
- Scissors or knife
- Possibly a trellis or support (depending on the tomato variety)
- Possibly mulch material (e.g., straw or wood chips)
Why Tomato Crates? The Advantages at a Glance:
- Better Drainage: Tomatoes don’t like waterlogged soil. Crates ensure good drainage, which prevents root rot.
- Easier Relocation: You can easily move the crates to give your tomato plants optimal sun exposure.
- Less Weeding: The crates keep weeds in check and make weeding easier.
- Better Soil Control: You can perfectly tailor the soil in the crates to the needs of your tomatoes.
- Space-Saving: Ideal for balconies, patios, or small gardens.
- Protection from Soil Pests: The crates offer some protection from pests that live in the soil.
- Earlier Harvest: The soil in the crates warms up faster, which can lead to an earlier harvest.
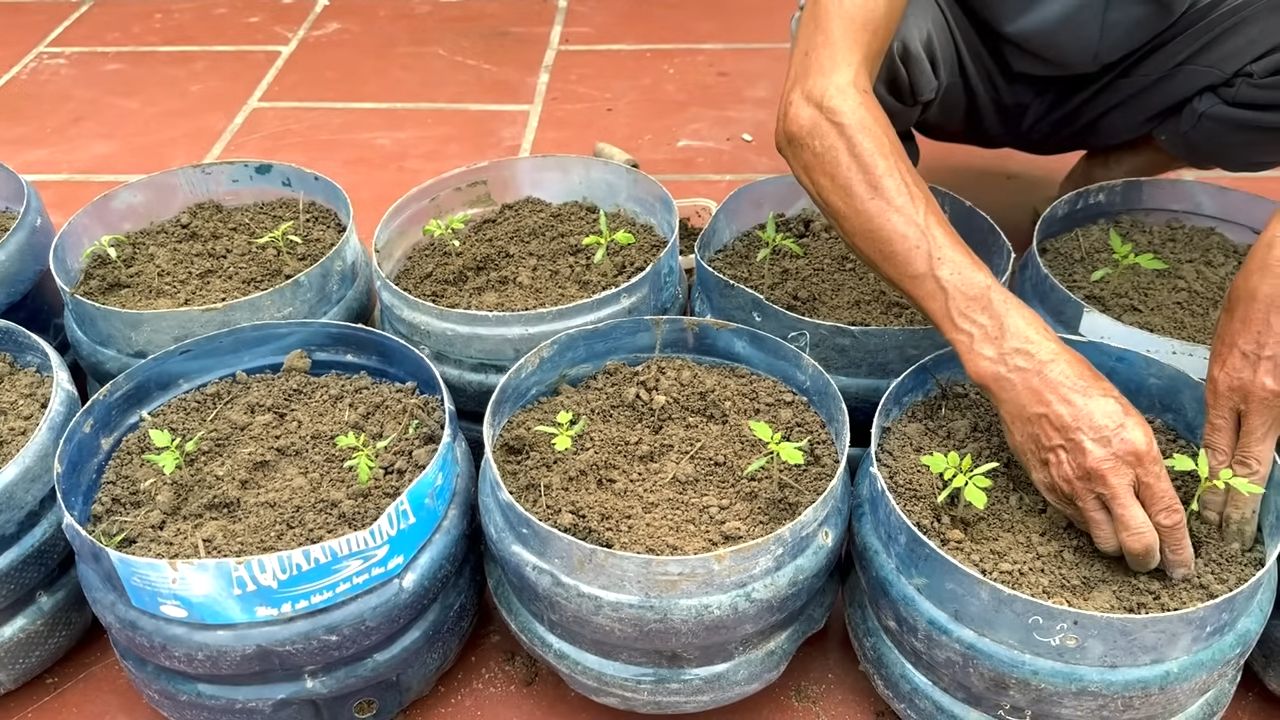
Step-by-Step Guide: Planting in Tomato Crates
1. Prepare the Crates:
- Clean the tomato crates thoroughly if they are used. Remove any soil and other residues.
- If you are using wooden crates, you can line them with garden fleece to protect the wood from moisture and extend the life of the crates. Cut the fleece to size and secure it with a few staples or tape.
- Check if the crates have enough drainage holes. If not, drill a few extra holes in the bottom.
2. Prepare the Soil:
- Fill the crates with high-quality tomato soil. Make sure the soil is loose and well-draining.
- Mix compost or organic fertilizer into the soil to provide your tomato plants with enough nutrients. I always use a mixture of compost and horn shavings – that has worked well for me.
3. Plant the Tomatoes:
- Dig a hole in each crate that is large enough to accommodate the root ball of the tomato plant.
- Carefully place the tomato plants in the holes and fill the holes with soil. Make sure the plants are not set too deep. The root ball should be just below the surface of the soil.
- Lightly press the soil down around the plants.
- Water the tomato plants thoroughly after planting.
4. Add a Support (optional):
- Depending on the tomato variety, your plants will need support. Indeterminate (vining) tomatoes definitely need a stake or a trellis to be tied to as they grow. Bush tomatoes are a bit more compact and don’t necessarily need a support, but it can still be helpful to support them.
- Install the support right after planting to avoid damaging the plant’s roots.
5. Mulch (optional):
- Apply a layer of mulch material (e.g., straw or wood chips) around the tomato plants. Mulching helps to retain moisture in the soil, suppress weeds, and protect the soil from temperature fluctuations.
Caring for Your Tomatoes in Crates:
- Watering: Water your tomato plants regularly, especially during the hot summer months. Make sure the soil is always slightly moist, but avoid waterlogging. It’s best to water in the morning so the leaves can dry during the day.
- Fertilizing: Fertilize your tomato plants regularly with a special tomato fertilizer. Follow the instructions on the packaging. I fertilize my tomatoes every two weeks.
- Pruning (Removing Suckers): Regularly remove the side shoots (suckers) from your tomato plants. This encourages the growth of the main stems and ensures better air circulation for the plants.
- Pests and Diseases: Regularly check your tomato plants for pests and diseases. If necessary, you can use organic pesticides or fungicides.
- Sun Protection: On particularly hot days, it can be a good idea to protect your tomato plants from direct sunlight. You can cover them with a sun sail or a shade cloth, for example.
Additional Tips for a Successful Tomato Harvest:
- Choose the right tomato variety: There are countless tomato varieties that differ in size, taste, and ripening time. Choose a variety that suits your preferences and the conditions in your garden.
- Plant your tomatoes in a sunny location: Tomatoes need at least six hours of sun per day to grow optimally and produce fruit.
- Ensure good ventilation: Good air circulation helps to prevent diseases. Make sure your tomato plants are not too close together.
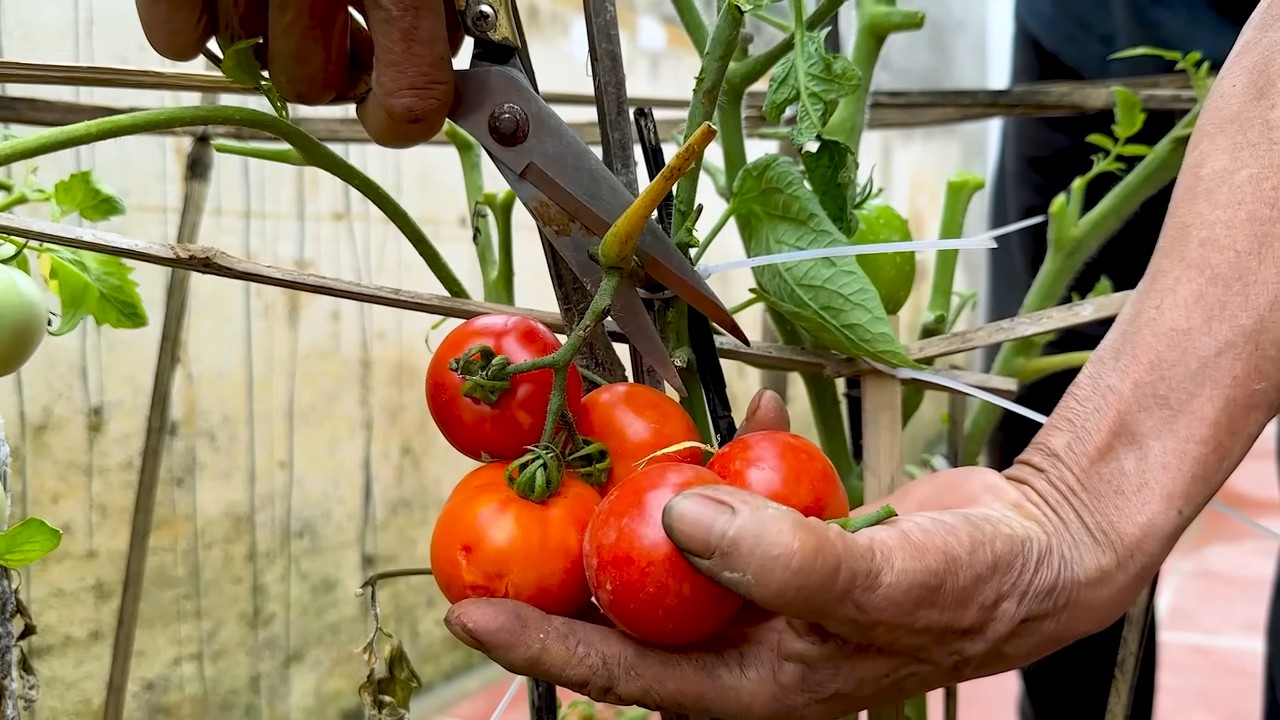
- Harvest your tomatoes on time: Harvest your tomatoes as soon as they are ripe. Ripe tomatoes are bright red (or yellow, orange, depending on the variety) and give slightly when pressed gently.
Avoiding Common Mistakes:
- Too little sun: Tomatoes need a lot of sun. A shady location will result in a small harvest.
- Too much water: Waterlogging leads to root rot. Ensure good drainage.
- Too little fertilizer: Tomatoes are heavy feeders. Regular fertilizing is important for a rich harvest.
- Wrong tomato variety: Choose a variety that is suitable for your climate and preferences.
- Neglect: Tomatoes need regular care. Check your plants regularly for pests and diseases.
One more little trick from me:
I have found that spraying the tomato blossoms with a light sugar solution (one teaspoon of sugar per liter of water) promotes pollination and leads to a higher number of fruits. Give it a try!
I hope this article has helped and inspired you to grow your own tomatoes in crates. With a little effort and the right tips, you can achieve a rich and delicious harvest. Happy gardening!
Conclusion
So, there you have it! The tomato can trick for harvesting is more than just a quirky gardening hack; it’s a game-changer for anyone who wants to maximize their yield and minimize plant damage. We’ve explored how this simple tool can transform your harvesting experience, making it easier, cleaner, and more efficient.
Why is this a must-try? Because it addresses several key challenges faced by gardeners, especially those growing delicate fruits and vegetables. The tomato can provides a protective barrier, preventing accidental bruising or crushing during the harvesting process. It also offers a clean, precise cut, reducing the risk of stem damage and promoting faster healing for the plant. This means healthier plants, more abundant harvests, and less waste.
But the beauty of this trick lies in its adaptability. While we’ve focused on tomatoes, don’t limit yourself! Consider using different sized cans for other fruits and vegetables like peppers, cucumbers, or even certain types of berries. You can also experiment with modifying the can itself. For example, adding a thin layer of foam or rubber around the rim can provide extra cushioning for particularly delicate produce. Another variation is to use a can opener to create a smoother, less sharp edge on the can, further minimizing the risk of scratching the fruit.
Beyond the practical benefits, the tomato can trick is also incredibly accessible. It requires no special tools or expensive equipment. You likely already have everything you need in your kitchen. This makes it a perfect solution for both novice and experienced gardeners alike. It’s a sustainable approach, repurposing materials that might otherwise end up in the recycling bin.
We’re confident that once you try this simple yet effective method, you’ll wonder how you ever harvested without it. It’s a testament to the power of simple ingenuity in the garden. It’s a practical, cost-effective, and environmentally friendly way to improve your harvesting process.
Don’t just take our word for it. We encourage you to give the tomato can trick a try in your own garden. Experiment with different variations, adapt it to your specific needs, and see the difference it can make. And most importantly, share your experience with us! We’d love to hear your tips, tricks, and success stories. Let us know what works best for you, what challenges you encountered, and how you’ve adapted the method to suit your unique gardening style. Your feedback will help us refine this technique and share it with even more gardeners around the world.
So, grab a tomato can, head out to your garden, and get ready to experience a whole new level of harvesting efficiency. Happy gardening!
Frequently Asked Questions (FAQ)
What size tomato can is best for harvesting tomatoes?
The ideal size of the tomato can depends on the size of the tomatoes you’re harvesting. A standard 14.5-ounce can works well for medium-sized tomatoes. For larger varieties like beefsteak tomatoes, you might want to use a larger can, such as a 28-ounce can. The key is to choose a can that allows the tomato to fit comfortably inside without being too tight, which could cause bruising.
Can I use other types of cans besides tomato cans?
Yes, you can use other types of cans as long as they are clean and have a smooth rim. Vegetable cans, fruit cans, or even soup cans can work well. Just make sure the can is the appropriate size for the fruit or vegetable you’re harvesting. Avoid using cans with sharp edges or rust, as these could damage the produce or pose a safety hazard.
How do I clean the tomato can before using it?
Cleaning the tomato can is essential to prevent the spread of diseases or bacteria to your plants. Wash the can thoroughly with soap and water, then rinse it well. You can also sanitize the can by soaking it in a solution of 1 part bleach to 9 parts water for a few minutes, then rinsing it thoroughly with clean water. Allow the can to dry completely before using it.
Will this trick work for all types of tomatoes?
The tomato can trick works well for most types of tomatoes, especially those that are prone to bruising or have delicate stems. However, for very small tomatoes like cherry tomatoes, it might not be necessary. For larger, heavier tomatoes, you might need to provide additional support to the stem while using the can to prevent it from breaking.
How do I prevent the tomato can from damaging the plant?
To prevent damage to the plant, make sure the rim of the can is smooth and free of sharp edges. You can use a can opener to smooth out any rough spots. Also, be gentle when inserting the can around the tomato and avoid forcing it. If the tomato is tightly clustered with other fruits, you might need to carefully prune some of the surrounding foliage to create enough space for the can.
What if I don’t have a tomato can? Are there any alternatives?
If you don’t have a tomato can, you can use other cylindrical objects with a similar size and shape. A plastic cup with the bottom cut out, a cardboard tube, or even a section of PVC pipe can work as alternatives. Just make sure the object is clean, smooth, and free of sharp edges.
Can I use this trick for other fruits and vegetables besides tomatoes?
Yes, the tomato can trick can be adapted for harvesting other fruits and vegetables with delicate skins or stems. Peppers, cucumbers, eggplants, and even some types of berries can benefit from this method. Just adjust the size of the can to fit the specific fruit or vegetable you’re harvesting.
How does the tomato can trick help prevent plant diseases?
By providing a clean, precise cut, the tomato can trick helps prevent the spread of plant diseases. When you tear or break the stem of a tomato plant, it creates an open wound that is susceptible to infection. The can allows you to make a clean cut with pruning shears or a knife, which promotes faster healing and reduces the risk of disease.
Is the tomato can trick environmentally friendly?
Yes, the tomato can trick is an environmentally friendly harvesting method. It repurposes materials that might otherwise end up in the recycling bin, reducing waste. It also eliminates the need for special tools or equipment, which can save resources and energy.
How can I share my experience with the tomato can trick?
We encourage you to share your experience with the tomato can trick by leaving a comment on this article, posting on social media using relevant hashtags, or sharing your tips and tricks with other gardeners in your community. Your feedback will help us refine this technique and share it with even more people. We are always looking for new ways to improve our gardening practices, and your input is invaluable.

Leave a Comment