
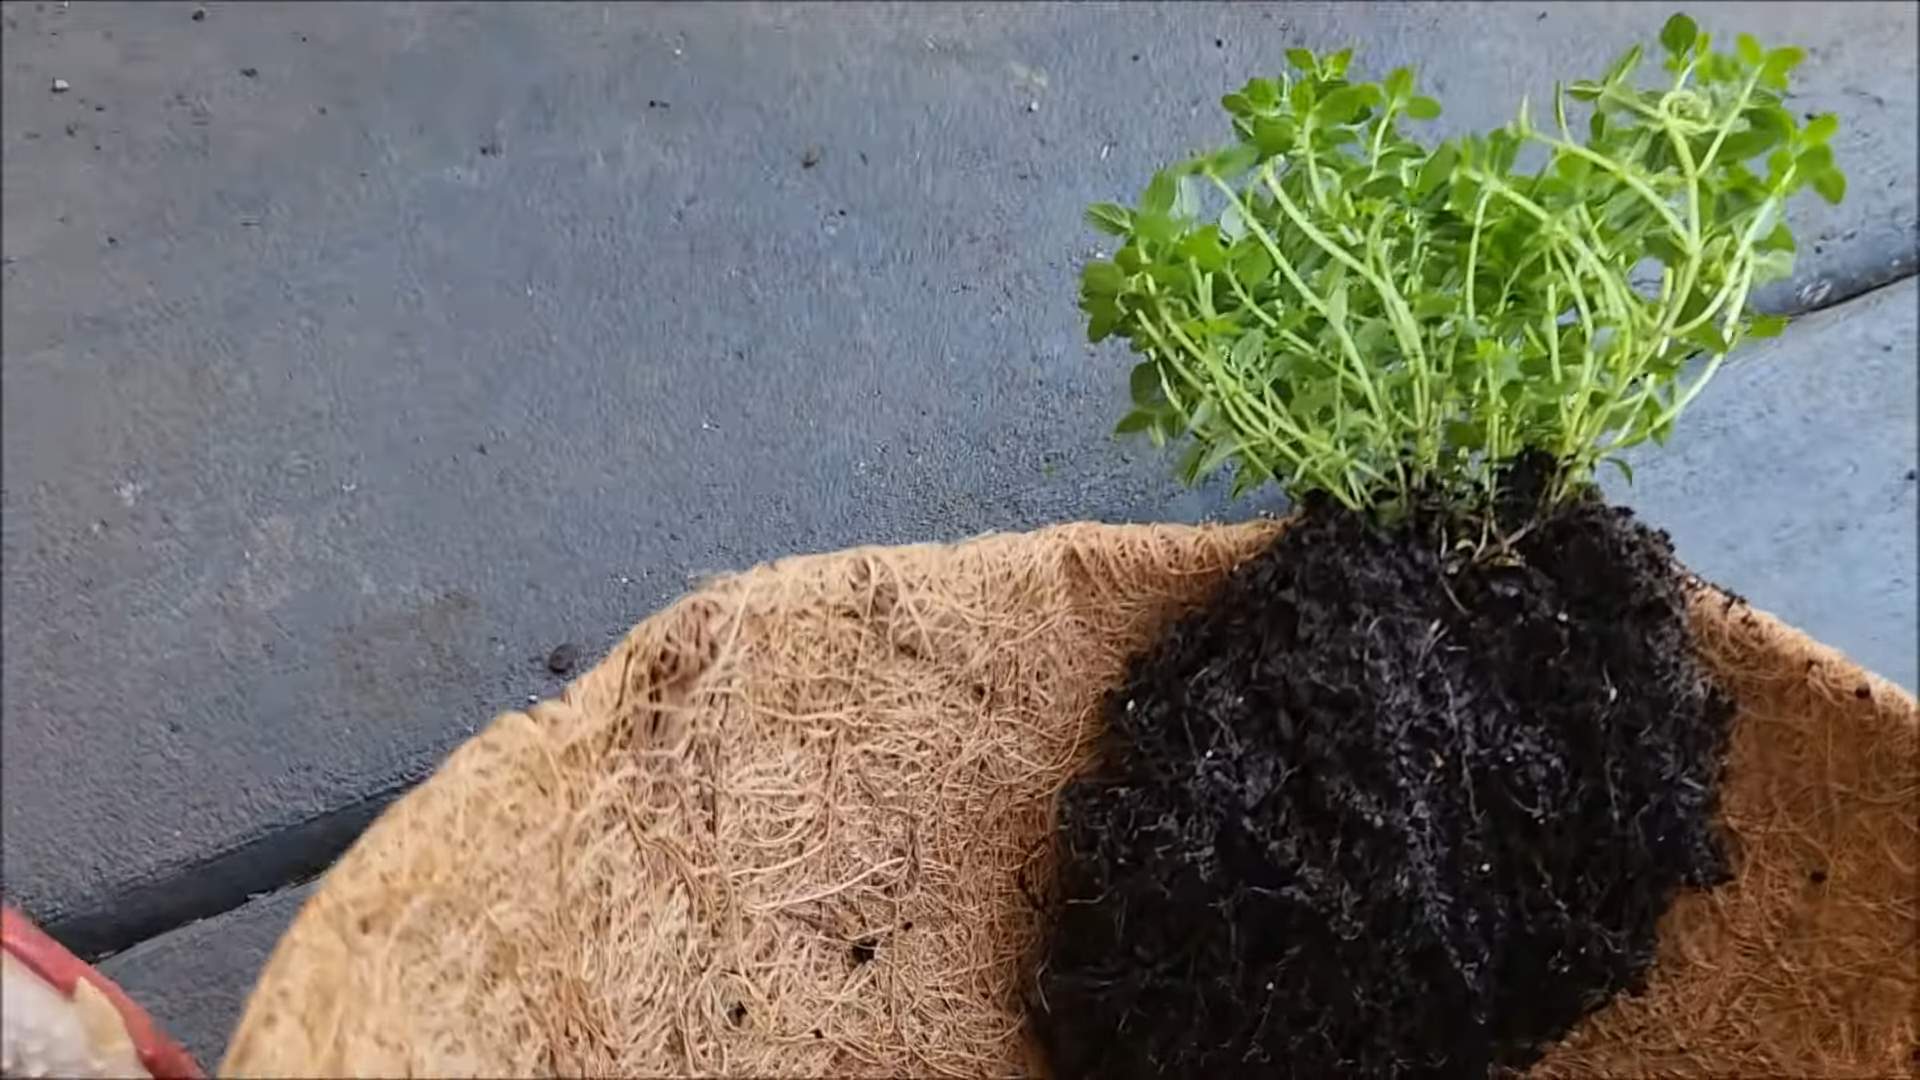
Year Round Thyme Supply – imagine having fresh, fragrant thyme at your fingertips, no matter the season! No more sad, dried-up jars from the grocery store. I’m going to show you how to achieve this culinary dream with some simple, yet effective, DIY tricks.
Thyme, with its delicate leaves and earthy aroma, has been cherished for centuries. Ancient Egyptians used it in embalming rituals, while the Greeks believed it symbolized courage. Today, it’s a staple in kitchens worldwide, adding depth and complexity to countless dishes. But let’s face it, keeping a steady supply of fresh thyme can be a challenge, especially during those harsh winter months.
That’s where these DIY hacks come in! I’ve gathered some of the best and easiest methods to ensure you have a year round thyme supply. Whether you’re a seasoned gardener or just starting out, these tips will empower you to grow and preserve your own thyme, saving you money and enhancing your culinary creations. Think of the delicious possibilities – thyme-infused oils, flavorful roasts, and aromatic teas, all made with your own homegrown thyme. So, let’s dive in and unlock the secrets to a never-ending thyme harvest!
Grow Your Own Radishes: A Beginner’s Guide to a Speedy Harvest
Hey there, fellow gardening enthusiasts! I’m so excited to share my love for growing radishes with you. These little root veggies are incredibly rewarding because they’re super easy to grow and mature in just a few weeks. Seriously, you can go from seed to salad in less than a month! Plus, they add a peppery kick to any dish. Let’s dive into how you can grow your own radishes at home, whether you have a sprawling garden or just a small balcony.
Choosing the Right Radish Variety
First things first, let’s talk about radish varieties. There are tons of options, each with its own unique flavor, size, and color. Here are a few of my favorites:
* Cherry Belle: These are the classic, round, bright red radishes you often see in the grocery store. They’re mild and crisp, perfect for salads.
* French Breakfast: These are elongated, red radishes with a white tip. They have a slightly milder flavor than Cherry Belles and are delicious with butter and salt.
* Easter Egg: This is a mix of radishes that come in a variety of colors, including red, pink, purple, and white. They’re a fun and colorful addition to any garden.
* Black Spanish: If you’re looking for something with a bit more bite, try Black Spanish radishes. They have a dark black skin and a pungent flavor. They also take a bit longer to mature.
* Daikon: These are long, white radishes that are popular in Asian cuisine. They have a mild, slightly sweet flavor and are great for pickling or adding to stir-fries.
I recommend starting with Cherry Belle or French Breakfast if you’re a beginner. They’re reliable and quick to grow.
Preparing Your Radish Growing Space
Radishes are pretty adaptable, but they do have some preferences when it comes to their growing environment.
* Sunlight: Radishes need at least 6 hours of sunlight per day. If you’re growing them indoors, make sure they’re near a sunny window or under grow lights.
* Soil: Well-drained, loose soil is crucial. Radishes need room to expand, and compacted soil can lead to misshapen or stunted roots. Amend your soil with compost or other organic matter to improve drainage and fertility. I like to use a mix of potting soil, compost, and perlite for container gardening.
* Container (if applicable): If you’re growing radishes in containers, choose pots that are at least 6 inches deep. This will give the roots enough room to grow. Make sure the containers have drainage holes to prevent waterlogging.
Planting Your Radish Seeds
Now for the fun part – planting! Radishes are cool-season crops, so the best time to plant them is in early spring or late summer/early fall.
1. Prepare the soil: Whether you’re planting in the ground or in containers, make sure the soil is loose and free of rocks and debris. Rake the surface smooth.
2. Sow the seeds: Radish seeds are small, so you don’t need to plant them too deep. Sow them about ½ inch deep and 1 inch apart. If you’re planting in rows, space the rows about 6 inches apart.
3. Cover the seeds: Gently cover the seeds with soil and pat it down lightly.
4. Water thoroughly: Water the soil gently but thoroughly after planting. Keep the soil consistently moist until the seeds germinate.
Succession Planting: To enjoy a continuous harvest of radishes, practice succession planting. Sow a new batch of seeds every 1-2 weeks. This way, you’ll have a steady supply of fresh radishes throughout the growing season.
Caring for Your Radish Plants
Radishes are relatively low-maintenance, but there are a few things you can do to ensure a successful harvest.
* Watering: Radishes need consistent moisture to grow quickly and develop crisp roots. Water them regularly, especially during dry spells. Avoid overwatering, as this can lead to root rot. I usually check the soil moisture level every day and water when the top inch feels dry.
* Thinning: Once the seedlings emerge, thin them to about 1-2 inches apart. This will give the remaining plants enough room to grow. You can eat the thinnings as microgreens!
* Weeding: Keep the area around your radish plants free of weeds. Weeds can compete with the radishes for nutrients and water.
* Fertilizing (Optional): Radishes don’t need a lot of fertilizer, but you can give them a boost with a light feeding of balanced fertilizer a few weeks after planting. I like to use a liquid seaweed fertilizer.
Dealing with Pests and Diseases
Radishes are generally pest-resistant, but there are a few common problems to watch out for.
* Flea Beetles: These tiny beetles can chew small holes in the leaves of your radish plants. To control flea beetles, you can cover your plants with row covers or spray them with insecticidal soap.
* Root Maggots: These are the larvae of certain flies that can tunnel into the roots of your radishes. To prevent root maggots, practice crop rotation and cover your plants with row covers.
* Clubroot: This is a fungal disease that can cause the roots of your radishes to become swollen and distorted. To prevent clubroot, make sure your soil is well-drained and avoid planting radishes in the same spot year after year.
I’ve found that keeping a close eye on my plants and addressing any problems early on is the best way to prevent serious infestations or diseases.
Harvesting Your Radishes
This is the moment you’ve been waiting for! Radishes are typically ready to harvest in 3-4 weeks, depending on the variety.
1. Check for maturity: Gently brush away the soil around the base of the plant to check the size of the radish. They’re usually ready to harvest when they’re about 1 inch in diameter.
2. Pull them up: Grasp the radish near the base of the leaves and gently pull it out of the ground. If the soil is dry, you may need to loosen it with a trowel first.
3. Wash and store: Wash the radishes thoroughly and remove the leaves. Store them in a plastic bag in the refrigerator for up to a week.
Don’t let them get too big: Radishes can become woody and bitter if they’re left in the ground for too long. Harvest them as soon as they’re ready.
Creative Ways to Enjoy Your Homegrown Radishes
Now that you’ve harvested your radishes, it’s time to enjoy them! Here are a few of my favorite ways to eat them:
* Salads: Slice or chop radishes and add them to salads for a peppery crunch.
* Snacks: Eat them raw with butter and salt. This is a classic French snack that’s simple and delicious.
* Pickled: Pickle radishes for a tangy and flavorful condiment.
* Roasted: Roast radishes with other root vegetables for a sweet and savory side dish.
* Radish Greens: Don’t throw away the radish greens! They’re edible and nutritious. Add them to salads, stir-fries, or soups. You can even make radish green pesto!
I hope this guide has inspired you to grow your own radishes at home. They’re a fun, easy, and rewarding crop that anyone can grow. Happy gardening!
Conclusion
So, there you have it! No more sad, wilted thyme sprigs languishing in the crisper drawer. No more last-minute dashes to the grocery store only to find they’re out of fresh thyme. This simple DIY trick for creating a year-round thyme supply is a game-changer for any home cook, regardless of your gardening prowess. It’s economical, sustainable, and ensures you always have that aromatic, earthy flavor on hand to elevate your dishes.
Why is this a must-try? Because it’s incredibly easy! Seriously, if you can water a plant, you can do this. It requires minimal effort and investment, yet yields maximum reward. Imagine the convenience of snipping fresh thyme leaves whenever inspiration strikes – whether you’re whipping up a comforting chicken soup, roasting vegetables, or adding a fragrant touch to your favorite pasta sauce. The possibilities are endless!
Beyond the basic method, feel free to experiment! Try different varieties of thyme. Lemon thyme, with its bright citrusy notes, would be a fantastic addition to fish dishes and salads. Creeping thyme, though typically used as ground cover, also boasts a delightful flavor and can be incorporated into your indoor herb garden. You could even create a small thyme-themed container garden, combining different varieties for a diverse flavor profile.
Consider the container you use. While a simple terracotta pot works perfectly well, you could also repurpose an old teacup, a vintage tin, or even a mason jar for a more rustic aesthetic. Just ensure the container has adequate drainage to prevent waterlogging.
Don’t be afraid to get creative with your placement, too. While a sunny windowsill is ideal, you can also supplement with a grow light if you live in a less sunny climate. This ensures your thyme receives the light it needs to thrive, even during the darker winter months.
We are confident that this method will revolutionize your cooking experience. It’s a small change that makes a big difference, transforming the way you approach herbs in your kitchen.
Now, it’s your turn! We wholeheartedly encourage you to give this DIY trick a try. Start with a single thyme plant and see how it goes. We’re willing to bet you’ll be hooked! Once you’ve mastered the art of maintaining a year-round thyme supply, we’d love to hear about your experience. Share your tips, tricks, and variations in the comments below. Let’s build a community of thyme-loving cooks and gardeners! Let us know what dishes you’ve elevated with your freshly grown thyme. Did you try a unique variety? Did you find a particularly clever way to display your thyme plant? We’re eager to learn from your experiences and celebrate your success. So go ahead, get your hands dirty, and enjoy the delicious rewards of having fresh thyme at your fingertips, all year round!
Frequently Asked Questions (FAQ)
What kind of thyme should I use?
The best type of thyme to use depends on your personal preference and what you plan to use it for. Common thyme (Thymus vulgaris) is a great all-purpose option with a classic, earthy flavor. Lemon thyme (Thymus citriodorus) offers a bright, citrusy twist that’s wonderful in fish dishes and salads. Creeping thyme (Thymus serpyllum) is more often used as ground cover, but its leaves are also edible and have a slightly milder flavor. Ultimately, experiment to find the thyme variety that best suits your culinary needs.
How much sunlight does my thyme plant need?
Thyme thrives in full sun, meaning it needs at least six hours of direct sunlight per day. If you’re growing your thyme indoors, place it on a sunny windowsill, preferably one that faces south or west. If you don’t have access to enough natural light, you can supplement with a grow light. Position the grow light a few inches above the plant and keep it on for 12-14 hours per day.
How often should I water my thyme plant?
Thyme prefers well-drained soil and doesn’t like to be overwatered. Water your thyme plant when the top inch of soil feels dry to the touch. When you water, water thoroughly until the water drains out of the bottom of the pot. Be sure to empty any excess water that collects in the saucer to prevent root rot. During the winter months, you’ll likely need to water less frequently.
What kind of soil should I use for my thyme plant?
Thyme prefers well-draining soil that is slightly alkaline. A good potting mix for thyme would be a blend of equal parts potting soil, perlite, and sand. This combination provides good drainage and aeration, which are essential for healthy thyme growth. Avoid using heavy, clay-based soils, as they can retain too much moisture and lead to root rot.
How do I harvest thyme?
Harvesting thyme is easy! Simply snip off sprigs of thyme using scissors or pruning shears. Avoid cutting more than one-third of the plant at a time, as this can stress the plant and hinder its growth. The best time to harvest thyme is in the morning, after the dew has dried. This is when the essential oils are most concentrated, resulting in the most flavorful leaves.
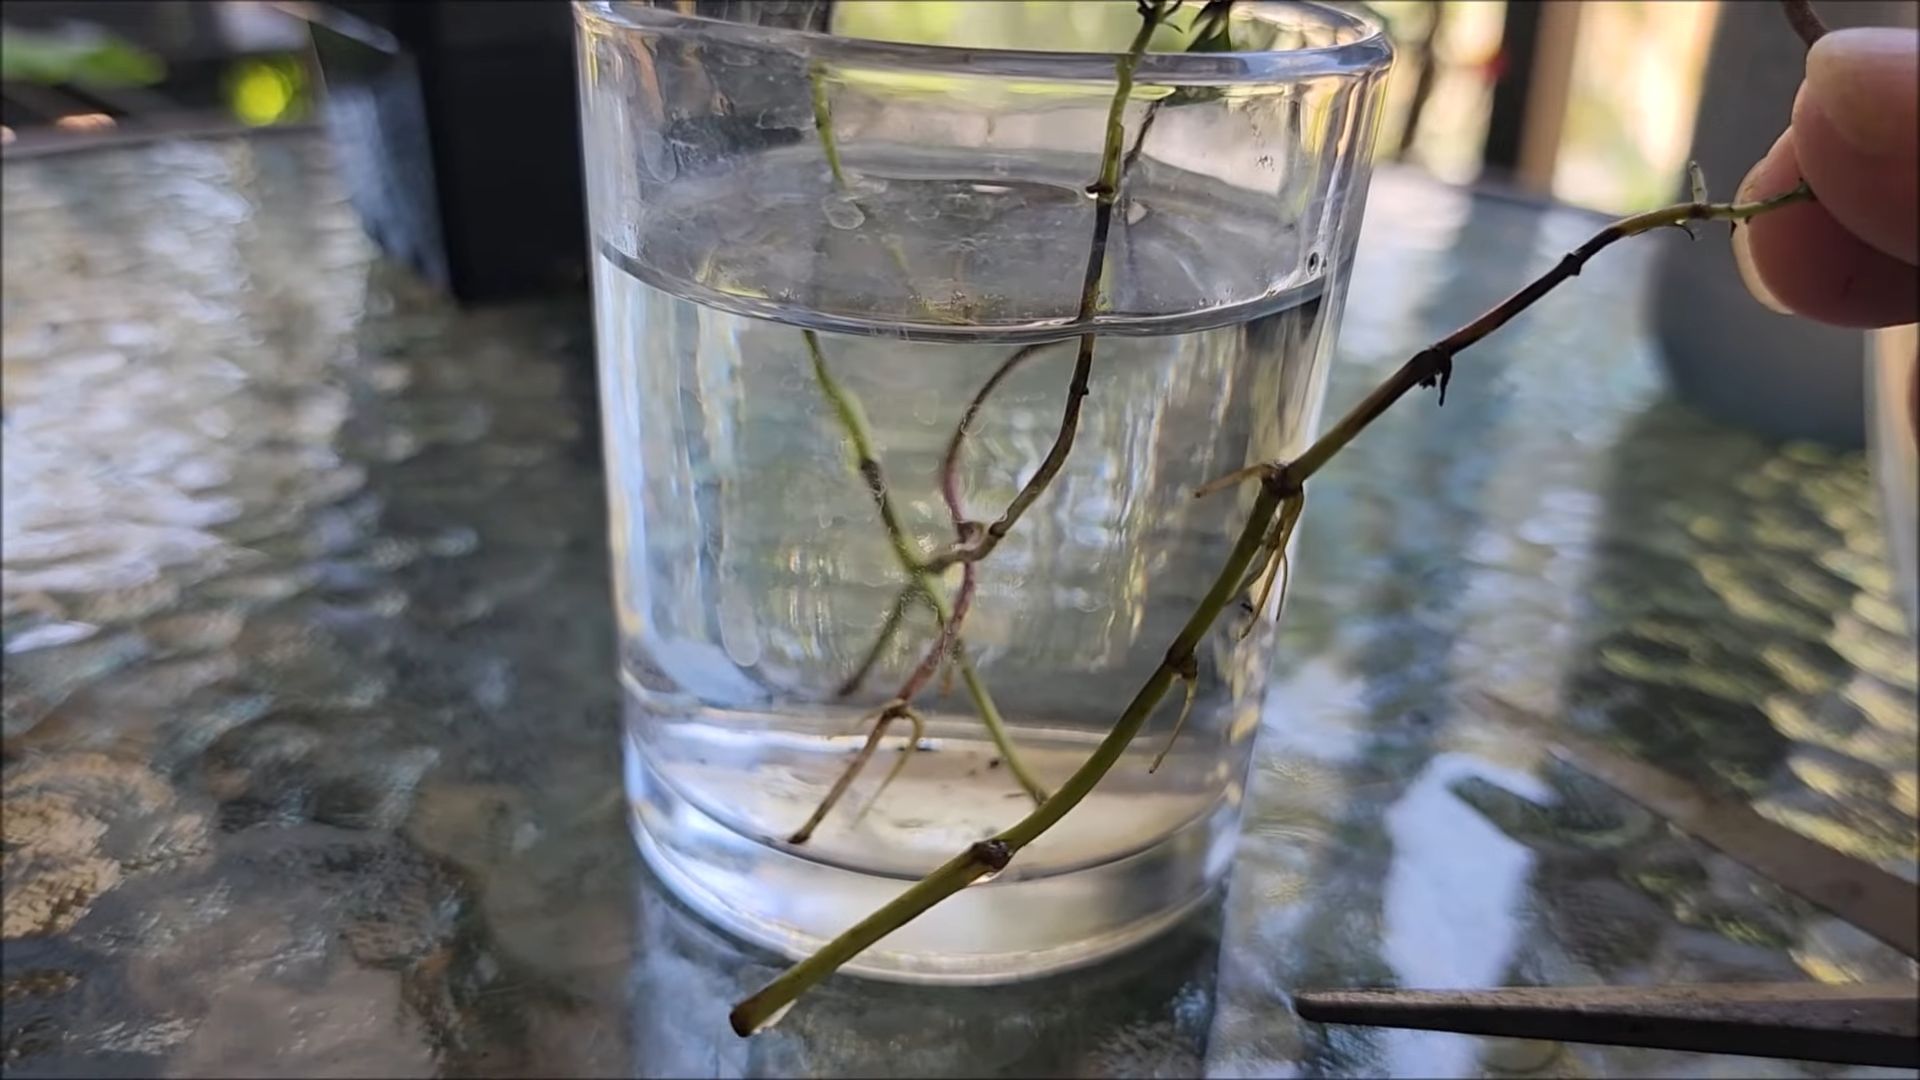
Can I propagate thyme from cuttings?
Yes, you can easily propagate thyme from cuttings. Take a 4-6 inch cutting from a healthy thyme plant, removing the leaves from the bottom inch of the stem. Dip the cut end in rooting hormone (optional) and plant it in a small pot filled with moist potting mix. Cover the pot with a plastic bag or humidity dome to create a humid environment. Place the pot in a warm, bright location, but out of direct sunlight. After a few weeks, the cutting should develop roots. Once the roots are established, you can transplant the new thyme plant into a larger pot.
My thyme plant is turning yellow. What’s wrong?
Yellowing leaves on a thyme plant can be caused by several factors, including overwatering, underwatering, nutrient deficiencies, or pests. Check the soil moisture to ensure you’re not overwatering or underwatering. If the soil is consistently wet, allow it to dry out completely before watering again. If the soil is bone dry, water thoroughly. You can also fertilize your thyme plant with a balanced liquid fertilizer to address any nutrient deficiencies. Inspect the plant for pests, such as aphids or spider mites, and treat accordingly.
Can I grow thyme indoors year-round?
Absolutely! With proper care, you can easily grow thyme indoors year-round. Provide your thyme plant with plenty of sunlight, well-draining soil, and regular watering. Avoid overwatering and fertilize occasionally. Prune your thyme plant regularly to encourage bushier growth. With a little attention, you’ll have a thriving thyme plant that provides you with fresh herbs all year long.
How do I store fresh thyme?
If you’re not using your freshly harvested thyme immediately, you can store it in the refrigerator. Wrap the thyme sprigs in a damp paper towel and place them in a plastic bag or container. This will help keep them fresh for up to a week. You can also dry thyme by hanging the sprigs upside down in a cool, dry place. Once the leaves are completely dry, store them in an airtight container. Dried thyme will retain its flavor for several months.
Is thyme good for you?
Yes! Thyme is packed with health benefits. It’s a good source of vitamins A and C, as well as minerals like copper, fiber, iron, and manganese. Thyme also has antiseptic and antifungal properties. It has been used traditionally to treat coughs, colds, and sore throats. Adding thyme to your diet is a delicious and easy way to boost your overall health.

Leave a Comment